1. 背景

数据库从存储引擎中读取数据,通常称之为 Scan 操作。

通常 Scan 需要考虑到以下因素:

  • 是否使用索引 ?使用哪些索引 ?
  • 是否并发读取 ?
  • 列式存储如何实现 Predicate Pushdown ?

索引

对于 OLTP 数据库,普遍使用的索引是 B-Tree,而 Postgres 面向特殊场景还支持一些额外的索引类型,如 GiST, GIN。

而 OLAP 数据库通常会使用粗粒度的二级索引,因为 OLAP 数据库都假定需要读取非常多的数据做计算,所以索引没有必要非常精细,通常由下面几种索引类型:

  • 最常用的 min-max 统计
  • 部分引擎(如 ORC)支持 bloom-filter
  • ClickHouse 支持的索引类型相对来说比较丰富,例如额外支持: setngrambf_v1

Parallel Scan

OLAP 查询因为涉及大量的数据 Scan,I/O 势必会成为瓶颈,所以需要充分利用 I/O 带宽,而 Parallel Scan 是一种计算机多核化趋势下的合理解决方案。

ClickHouse 使用多线程读取模型并行读取数据,后文会有更详细的源码解析。

业界也有其他数据库支持 Parallel Scan,如 Postgres 在 9.6 版本新增 Parallel Sequential Scan 特性,Kudu 同样支持 Parallel Scan,而对于 Spark/Flink 等大数据计算引擎,Parallel Scan 是默认的模式(不同的数据源实现可能有差异)。

Predicate Pushdown

将 SQL 查询中的 Where 部分,下推到存储引擎执行,这个过程称之为 Predicate Pushdown (谓词下推)。

但在列式存储引擎面前有一个额外问题需要考虑,如何高效执行 Predicate Pushdown ?

  • 方案 1: 读取所有 Column,再执行 Filter
  • 方案 2: 先读取 Filter 相关的 Column,Filter 后识别哪些 Row Range 不用再读取,然后读取剩余 Column

方案 2 相比方案 1 潜在上可以提升性能,因为可以减少冗余 IO. 但是 ClickHouse 使用的方案 1, 但是有简单的判空 Skip.

2. MergeTree Read-Path 概述

简单来讲,MergeTree Read Path 包含以下几个阶段:

此为笔者自己总结,非官方资料

  • 阶段 1: Analysis, 确定读哪些 data part,哪些 range
  • 阶段 2: Parallel, 并行化,拆分成 N 个线程执行
  • 阶段 3: Read, 反序列化读取数据

如下图所示:

3. MergeTree Read-Path 源码解析

MergeTree Read-Path 整体调用链路要比 Write-Path 长的多。 额外新增 Call Tree 一节辅助想要看更多源码细节的读者快速找到对应的函数。

Call Tree

- InterpreterSelectQuery::InterpreterSelectQuery
  - MergeTreeWhereOptimizer::optimize
- InterpreterSelectQuery::executeImpl
  - InterpreterSelectQuery::executeFetchColumns
    - MergeTreeDataSelectExecutor::read
      - MergeTreeDataSelectExecutor::readFromParts
        - ReadFromMergeTree::initializePipeline
          - ReadFromMergeTree::getAnalysisResult
            - ReadFromMergeTree::selectRangesToRead
              - MergeTreeDataSelectExecutor::filterPartsByPartition
              - MergeTreeDataSelectExecutor::filterPartsByPrimaryKeyAndSkipIndexes
                - MergeTreeDataSelectExecutor::markRangesFromPKRange
                - MergeTreeDataSelectExecutor::filterMarksUsingIndex
            - ReadFromMergeTree::spreadMarkRangesAmongStreams
              - ReadFromMergeTree::read
                - ReadFromMergeTree::readFromPool
                  - MergeTreeReadPool
                    - MergeTreeReadPool::fillPerThreadInfo
                  - Parallel Thread: MergeTreeThreadSelectProcessor
                    - MergeTreeBaseSelectProcessor::generate
                      - MergeTreeReadPool::getTask
                      - MergeTreeBaseSelectProcessor::readFromPartImpl
                        - MergeTreeRangeReader::read
                          - MergeTreeRangeReader::startReadingChain
                          - MergeTreeRangeReader::executePrewhereActionsAndFilterColumns
                          - MergeTreeRangeReader::continueReadingChain
                            - MergeTreeReaderWide::readRows
                              - MergeTreeReaderWide::readData
                                - SerializationString DB::deserializeBinarySSE2

P1: Analysis

Analysis 阶段: 分析需要读取哪些 Part,以及 Part 中哪些部分需要读取。

P1.1 自动添加 PreWhere

关于 PreWhere 的更多介绍见 PREWHERE Clause.

PreWhere 是 ClickHouse 扩展的 SQL 子句,其在 Where 子句之前执行。 通常情况下,你并不需要显示写明 PreWhere,ClickHouse 会自动将合适的 Where 子句条件转移到 PreWhere 子句下。

void MergeTreeWhereOptimizer::optimize(ASTSelectQuery & select) const
{
    // MK: 如果已经手动定义过 PreWhere,将不会进行自动的 PreWhere 分析
    if (!select.where() || select.prewhere())
        return;

    UInt64 total_size_of_moved_conditions = 0;
    /// Move condition and all other conditions depend on the same set of columns.
    auto move_condition = [&](Conditions::iterator cond_it)
    {
        prewhere_conditions.splice(prewhere_conditions.end(), where_conditions, cond_it);
        total_size_of_moved_conditions += cond_it->columns_size;
        // MK: ...
    };

    /// Move conditions unless the ratio of total_size_of_moved_conditions to the total_size_of_queried_columns is less than some threshold.
    while (!where_conditions.empty())
    {
        /// Move the best condition to PREWHERE if it is viable.
        // MK: 选择数据量最小的 column
        auto it = std::min_element(where_conditions.begin(), where_conditions.end());

        bool moved_enough = false;
        if (total_size_of_queried_columns > 0)
        {
            /// If we know size of queried columns use it as threshold. 10% ratio is just a guess.
            moved_enough = total_size_of_moved_conditions > 0
                && (total_size_of_moved_conditions + it->columns_size) * 10 > total_size_of_queried_columns;
        }
        // MK: ...
        if (moved_enough)
            break;
        move_condition(it);
    }

    // MK: ...
    // MK: 可以打开 Debug 日志,观察哪些 column 被自动移入 PREWHERE
    LOG_DEBUG(log, "MergeTreeWhereOptimizer: condition \"{}\" moved to PREWHERE", select.prewhere());
}
  • 当 SQL 语句已经提前声明了 PreWhere 时,ClickHouse 将不再进行 PreWhere 优化分析,因此有足够把握比 ClickHouse 做的好的时候再手动添加 PreWhere
  • 尽量将 size 比较小的 Where 谓词相关的 Columns 移动到 PreWhere
  • 移入 PreWhere 的 Columns 总 size 不大于整体的 10%, 此值为经验值并且不可以通过 settings 配置

P1.2 通过 Partition 筛选 Parts

每次插入都会生成新的 Part,Part 会在后台定期 Merge,仅在同一个 Partition 分区的 Part 才可以 Merge,Part 在达到一个预置的大小(默认 150GB)会停止 Merge。 因此 MergeTree 表是由多个 Partition 构成的,filterPartsByPartition 函数用来筛选查询需要的 Part。

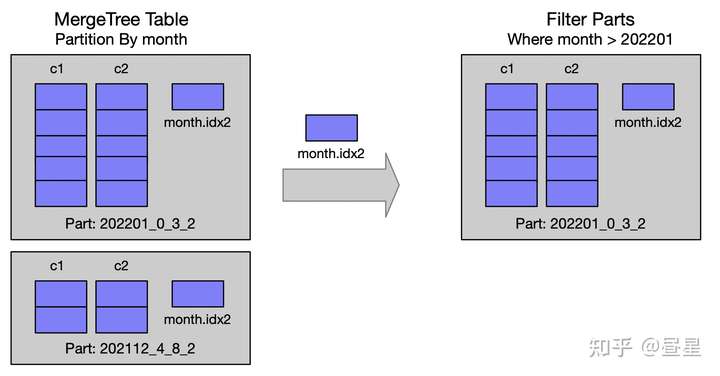
void MergeTreeDataSelectExecutor::filterPartsByPartition( 
    MergeTreeData::DataPartsVector & parts,
    ... )
{
    // MK: ...
    minmax_idx_condition.emplace(
        query_info, context, minmax_columns_names, 
        data.getMinMaxExpr(partition_key, ExpressionActionsSettings::fromContext(context)));
    partition_pruner.emplace(metadata_snapshot, query_info, context, false /* strict */);

    selectPartsToRead( ... );
    // MK: ...
}

void MergeTreeDataSelectExecutor::selectPartsToRead(
    MergeTreeData::DataPartsVector & parts,
    ... )
{
    MergeTreeData::DataPartsVector prev_parts;
    std::swap(prev_parts, parts);
    for (const auto & part_or_projection : prev_parts)
    {
        // MK: ...

        if (minmax_idx_condition && !minmax_idx_condition->checkInHyperrectangle(
                part->minmax_idx->hyperrectangle, minmax_columns_types).can_be_true)
            continue;

        if (partition_pruner)
        {
            if (partition_pruner->canBePruned(*part))
                continue;
        }

        parts.push_back(part_or_projection);
    }
}
  • 对于所有的 Part,遍历并检查是否可以 Skip
  • 检查依据是 Part 在写入时,记录的 Partition 相关 Column 的 min-max 索引
  • 更多细节可查看源码

P1.3 根据 PK/Index 筛选 Range

Primary key 是有序的,可以根据 Primary key 来筛选相关的 Range。 此外,ClickHouse 支持 Bloom-Filter、Min-Max、Set 等粗粒度二级索引,用来过滤 Granule。

struct MarkRange
{
    size_t begin;
    size_t end;

    // MK: ...
};

using MarkRanges = std::deque<MarkRange>;

struct RangesInDataPart
{
    MergeTreeData::DataPartPtr data_part;
    size_t part_index_in_query;
    MarkRanges ranges;

    // MK: ...
};

using RangesInDataParts = std::vector<RangesInDataPart>;
  • MarkRanges 及 RangesInDataParts 的定义
  • RangesInDataParts 标记出在每个 Part,有哪些 MarkRanges 是需要读取的
RangesInDataParts MergeTreeDataSelectExecutor::filterPartsByPrimaryKeyAndSkipIndexes (
    MergeTreeData::DataPartsVector && parts,
    ...)
{
    // MK: ...

    auto process_part = [&](size_t part_index)
    {
        auto & part = parts[part_index];

        if (metadata_snapshot->hasPrimaryKey())
            // MK: 根据 primary key 筛选 part 下的 ranges
            ranges.ranges = markRangesFromPKRange(part, metadata_snapshot, key_condition, settings, log);
        else if (total_marks_count)
            ranges.ranges = MarkRanges{MarkRange{0, total_marks_count}};

        // MK: ...
        for (auto & index_and_condition : useful_indices)
        {
            // MK: 根据 secondary index 筛选 part 下的 ranges
            ranges.ranges = filterMarksUsingIndex( ... );
        }

        // MK: ...
    };

    /// Parallel loading of data parts.
    ThreadPool pool(num_threads);

    for (size_t part_index = 0; part_index < parts.size(); ++part_index)
        pool.scheduleOrThrowOnError([&, part_index, thread_group = CurrentThread::getGroup()]
        {
            // MK: ...
            process_part(part_index);
        });

    return parts_with_ranges;
}
  • 多线程并行处理多个 Part (有最大并发限制)
  • markRangesFromPKRange 根据 Primary Key 筛选 Part Ranges
  • filterMarksUsingIndex 根据 Secondary Indexs 筛选 Part Ranges
  • markRangesFromPKRange 为纯内存操作,Primary Key 已经 Cache 在内存中
  • filterMarksUsingIndex 需要有 Disk IO

P2: Parallel

Parallel 阶段: 将读取任务拆解为 N 个可并行的读取任务,即为 Parallel Scan.

首先,我们考虑一个问题,如何并行扫描效率是最高的 ?和下列因素相关:

  1. 并行度, 也就是同时有多少线程/进程可以用来扫描数据
  2. 磁盘总 IO 带宽
  3. IO 次数

ClickHouse 在读取任务的规划上,做了下述决策来提升性能:

  1. (并行度) 尽可能利用 CPU 资源,查询并发默认为物理核数。
  2. (IO 带宽) 分散线程负载到多个磁盘,尽可能充分利用磁盘带宽
  3. (IO 次数) 读取时不留“小尾巴”,如果一个 Part 内只剩少量数据时,一次读取完
  4. (Steal Tasks) 当一些线程提前完成读取任务时,可以执行预分配给其他线程的任务

下面我们可以看下实现细节。

P2.1: 将读取任务分配到多个线程

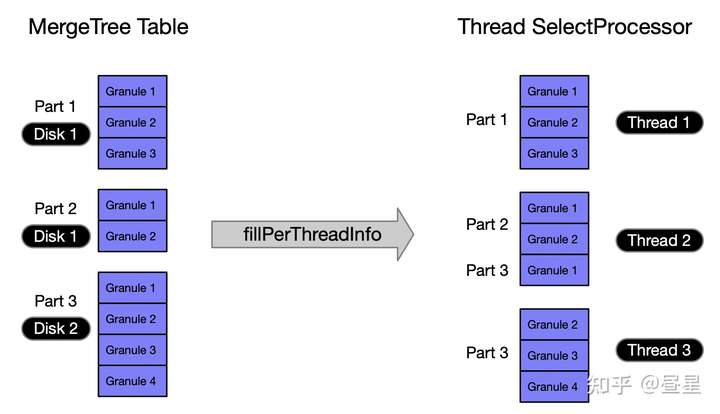
void MergeTreeReadPool::fillPerThreadInfo(
    const size_t threads, const size_t sum_marks, std::vector<size_t> per_part_sum_marks,
    const RangesInDataParts & parts, const size_t min_marks_for_concurrent_read)
{
    // MK: 类型定义及初始化 ...

    {
        // MK: 将 part 按 Disk 分组到 parts_per_disk
        // MK: ...

        for (auto & info : parts_per_disk)
            parts_queue.push(std::move(info.second));
    }

    const size_t min_marks_per_thread = (sum_marks - 1) / threads + 1;

    // MK: 按 Disk 分配线程负载,最大化磁盘 IO 带宽利用率
    for (size_t i = 0; i < threads && !parts_queue.empty(); ++i)
    {
        auto need_marks = min_marks_per_thread;

        while (need_marks > 0 && !parts_queue.empty())
        {
            // MK: ...

            /// Get whole part to read if it is small enough.
            if (marks_in_part <= need_marks)
            {
                // MK: 整个 Part 作为当前 Task
                // 但不会继续塞入下个 Part
            }
            else
            {
                /// Loop through part ranges.
                while (need_marks > 0)
                {
                    // MK: ...
                    // MK: 在单个 Part 内部,持续向 Task 内添加 Mark 直到到达每个 Task 的 need_marks
                    ranges_to_get_from_part.emplace_back(range.begin, range.begin + marks_to_get_from_range);
                    // MK: ...
                    if (range.begin == range.end)
                        part.ranges.pop_front();
                    // MK: ...
                    need_marks -= marks_to_get_from_range;
                }
            }

            threads_tasks[i].parts_and_ranges.push_back({ part_idx, ranges_to_get_from_part });
            threads_tasks[i].sum_marks_in_parts.push_back(marks_in_ranges);
            if (marks_in_ranges != 0)
                remaining_thread_tasks.insert(i);
        }
        // MK: ...
    }
}
  • 将所有 Part 按物理存储磁盘排序
  • 按序将磁盘负载分散到 N 个线程,这样可减少线程间的 IO 竞争

P2.2: 获取当前线程执行的 Task

并不会将线程需要完成的所有任务初始时全部分配,而是每次仅会分配一个小量级的数据读取任务。

通过参数: merge_tree_min_rows_for_concurrent_read / merge_tree_min_bytes_for_concurrent_read 配置读取的数据量级。

MergeTreeReadTaskPtr MergeTreeReadPool::getTask(const size_t min_marks_to_read, const size_t thread, const Names & ordered_names)
{
    // MK: 无任务时直接返回 nullptr ...

    /// Steal task if nothing to do and it's not prohibited
    auto thread_idx = thread;
    if (!tasks_remaining_for_this_thread)
    {
        auto it = remaining_thread_tasks.lower_bound(backoff_state.current_threads);
        // Grab the entire tasks of a thread which is killed by backoff
        if (it != remaining_thread_tasks.end())
        {
            // MK: 先检查是否还有剩下的可以执行的任务 ...
        }
        else // Try steal tasks from the next thread
        {
            // MK: 当前线程没有任务可以执行时,执行其他线程的 Task (Steal Tasks)
            it = remaining_thread_tasks.upper_bound(thread);
            if (it == remaining_thread_tasks.end())
                it = remaining_thread_tasks.begin();
            thread_idx = *it;
        }
    }
    auto & thread_tasks = threads_tasks[thread_idx];

    // MK: ...

    return std::make_unique<MergeTreeReadTask>(
        part.data_part, ranges_to_get_from_part ...);
}
  • getTask() 函数参数 min_marks_to_read, 通过 setting 配置 merge_tree_min_rows_for_concurrent_read / merge_tree_min_bytes_for_concurrent_read 计算得到
  • merge_tree_min_rows_for_concurrent_read 默认值为 163840,大约是 20 个 Granule。
  • 如果当前线程已经没有剩余 Task,则分配其他线程的待执行任务 (Steal Tasks)

P3: Read

分配好每个线程的任务后,就可以开始真正读取数据了。

从宏观结构上,ClickHouse 将读取分成了两部分

此为笔者自己总结,非官方资料

  • Read Pre-Where Columns, 先读取 Pre-Where 相关 Columns
  • Read Remaining Columns, 再读取剩余 Columns

Read Pre-Where Columns 过程中,还会对数据进行 Filter,如果 Filter 后无数据,便不会进行后续的 Read Remaining Columns 步骤。

P3.1: Read Pre-Where Columns

MergeTreeRangeReader::ReadResult MergeTreeRangeReader::read(size_t max_rows, MarkRanges & ranges)
{
    // MK: ...
    if (prev_reader)
    {
        // MK: 分支 1

        // MK: 如果有 pre where 条件,先把 pre where 涉及的字段读出来
        read_result = prev_reader->read(max_rows, ranges);

        // MK: 再把除了 pre where 剩下的字段读出来
        Columns columns = continueReadingChain(read_result, num_read_rows);
        // MK: ...
        if (has_columns)
        {
            // MK: 如果有 Filter,就地执行 filter ...
            if (read_result.getFilter())
                filterColumns(columns, read_result.getFilter()->getData());
        }

        // MK: 将上面读到的两部分字段合并...
        for (auto & column : columns)
            read_result.columns.emplace_back(std::move(column));
    }
    else
    {
        // MK: 分支 2

        read_result = startReadingChain(max_rows, ranges);
        // MK: ...
    }

    // MK: 分支 3

    // MK: 如果有 pre where 条件,构建 filter column
    // MK: pre where 相关的 columns 就地执行 filter
    executePrewhereActionsAndFilterColumns(read_result);
    return read_result;
}
  • 这里逻辑稍微有一点绕,读取 Pre-Where 相关 Columns 时,仅会走 分支 2分支 3
  • 而读取完 Pre-Where 后,仅会走 分支 1continueReadingChain 函数读取剩下的 Columns
  • executePrewhereActionsAndFilterColumns 逻辑不再详述,感兴趣可以去阅读源码

P3.3: Read Rows 具体实现

下面是读取的具体实现。

readRows() 函数读取范围行数内的所有列的数据。 分别对每一列数据,使用对应的反序列化方法进行读取。

size_t MergeTreeReaderWide::readRows(
    size_t from_mark, size_t current_task_last_mark, bool continue_reading, size_t max_rows_to_read, Columns & res_columns)
{
    try
    {
        // MK: ...
        for (size_t pos = 0; pos < num_columns; ++pos, ++name_and_type)
        {
            auto column_from_part = getColumnFromPart(*name_and_type);
            // MK: ...

                readData(
                    column_from_part, column, from_mark, continue_reading, current_task_last_mark,
                    max_rows_to_read, cache, /* was_prefetched =*/ !prefetched_streams.empty());

            // MK: ...
        }
    }
    // MK: ...

    return read_rows;
}

void MergeTreeReaderWide::readData(...)
{
    // MK: ...
    auto serialization = data_part->getSerialization(name_and_type);
    // MK: ...

    serialization->[[CH.ISerialization::deserializeBinaryBulkWithMultipleStreams]](column, max_rows_to_read, deserialize_settings, deserialize_state, &cache);
}

下面是 String 类型的反序列化代码解析。

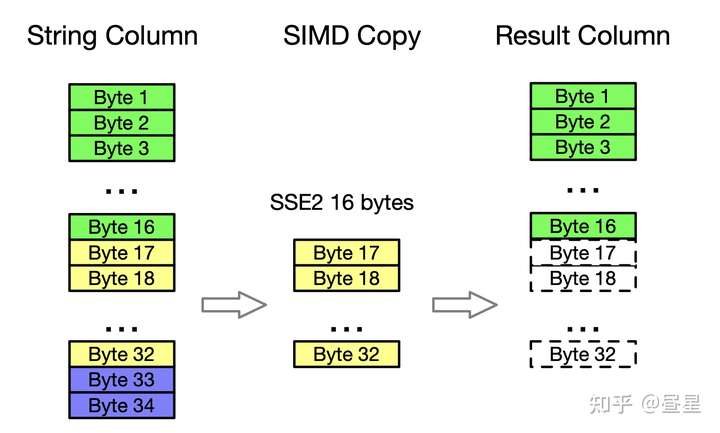
void SerializationString::deserializeBinaryBulk(IColumn & column, ReadBuffer & istr ...) const
{
    // MK: ...
    // MK: 读取 String 类型 Column 时,开启了 SSE2 指令集相关优化
    if (avg_chars_size >= 64)
        deserializeBinarySSE2<4>(data, offsets, istr, limit);
    else if (avg_chars_size >= 48)
        deserializeBinarySSE2<3>(data, offsets, istr, limit);
    else if (avg_chars_size >= 32)
        deserializeBinarySSE2<2>(data, offsets, istr, limit);
    else
        deserializeBinarySSE2<1>(data, offsets, istr, limit);
}

template <int UNROLL_TIMES>
static NO_INLINE void deserializeBinarySSE2(ColumnString::Chars & data, ColumnString::Offsets & offsets, ReadBuffer & istr, size_t limit)
{
    size_t offset = data.size();
    for (size_t i = 0; i < limit; ++i)
    {
        if (istr.eof())
            break;

        UInt64 size;
        readVarUInt(size, istr);

        offset += size + 1;
        offsets.push_back(offset);

        data.resize(offset);

        if (size)
        {
#ifdef __SSE2__
            /// An optimistic branch in which more efficient copying is possible.
            if (offset + 16 * UNROLL_TIMES <= data.capacity() && istr.position() + size + 16 * UNROLL_TIMES <= istr.buffer().end())
            {
                const __m128i * sse_src_pos = reinterpret_cast<const __m128i *>(istr.position());
                const __m128i * sse_src_end = sse_src_pos + (size + (16 * UNROLL_TIMES - 1)) / 16 / UNROLL_TIMES * UNROLL_TIMES;
                __m128i * sse_dst_pos = reinterpret_cast<__m128i *>(&data[offset - size - 1]);

                while (sse_src_pos < sse_src_end)
                {
                    // MK: _mm_storeu_si128 / _mm_loadu_si128 为 C++ 编译器提供的 SIMD 内置函数
                    //   _mm_loadu_si128 -> SSE2 指令 MOVDQU
                    //   _mm_storeu_si128 -> SSE2 指令 MOVDQU (底层对应于相同的 CPU 指令)
                    for (size_t j = 0; j < UNROLL_TIMES; ++j)
                        _mm_storeu_si128(sse_dst_pos + j, _mm_loadu_si128(sse_src_pos + j));

                    sse_src_pos += UNROLL_TIMES;
                    sse_dst_pos += UNROLL_TIMES;
                }

                istr.position() += size;
            }
            else
#endif
            {
                // MK: 不支持SSE2/尾部未对齐时的保底复制方案
                istr.readStrict(reinterpret_cast<char*>(&data[offset - size - 1]), size);
            }
        }

        data[offset - 1] = 0;
    }
}
  • String 类型的反序列化做了 SIMD 优化 (SSE2 指令集)
  • ClickHouse 广泛使用 SIMD 指令集来提升热点函数性能
  • 此处为较为简单的 SIMD 应用场景: 快速内存复制 (一次性复制更多字节内存)
  • 对未对齐的尾部元素及不支持 SSE2 指令集的场景,有保底处理

4. 总结

至此我们已经完成了从查询时候的 Part Ranges 分析,到最终反序列化 String 类型的 Column 读取到内存中的过程。 MergeTree Read Path 基础的流程已全面覆盖,以下细节出于篇幅未展开,感兴趣可以继续深入源码:

  • MergeTree projection
  • Partition / Primary Key / Secondary Index 的实现细节

MergeTree Write-path 过程中的耗时主要分布于:

  • 读取二级索引判断需要读取的 Part Ranges
  • 读取数据时的 Disk IO
  • 将数据反序列化

性能建议:

  • 避免 Part 总数过多,尽管 ClickHouse 会启动多个线程分析 Part 索引,但难免有木桶效应,因此不要让 Part 总数过多,把查询时间过多浪费在分析 Part Range 上
  • 使用多块磁盘,ClickHouse 可以充分利用磁盘 IO 带宽 (建议使用 RAID)
  • 注意二级索引的使用,索引不是越多越好,如果加的索引不能有效地减少Scan数据量,会有查询 overhead 浪费性能
  • PreWhere 子句谨慎手动填写,除非确认自己可以做的更好。

5. 参考文献


1. 背景

存储引擎 是数据库设计的基石。

1.1 数据库存储体系

计算机架构本身具有层级化的存储体系


出于性能、数据量级、数据可用级别等多方面考虑,数据库对存储介质的选项可以分为:

  • In-Memory Database, 内存数据库
  • Disk-Oriented Database, 基于磁盘的数据库

无论是 In-Memory Database 还是 Disk-Oriented Database,都会希望相似的数据组织在一起。

  • 对于 Disk-Oriented Database,I/O 是核心的性能瓶颈 (大部分情况)
  • 对于 In-Memory Database, CPU Cache Miss 是核心的性能瓶颈

尤其是对于 Disk-Oriented Database,在组织数据时,有两种组织数据的范式:

  • N-ary Storage Model, 行式存储
  • Decomposition Storage Model, 列式存储

N-ary Storage Model 面向 OLTP 查询并且关注事务一致性, 而 Decomposition Storage Model 面向 OLAP 查询。

  • OLTP(Online Transaction Processing): 事务、涉及数据量小、更新频率高、简单查询、ms 级
  • OLAP(Online Analytical Processing): 涉及数据量大、聚合/关联、复杂查询、秒级
  • HTAP(Hybrid Transaction/Analytical Processing): OLTP、OLAP 的折中


ClickHouse 核心设计目标是尽可能快的执行 Group By 聚合查询,所以 ClickHouse 属于 OLAP 数据库,并且顺其自然,ClickHouse 使用列式存储。

在 OLAP 领域,有几个有一定影响力的项目:

  • VerticaVectorWiseMonetDB 是早期的列式存储数据库
  • Google Dremel 是大数据领域实时分析的先驱者
  • Dremel 催生了 Parquet
  • Parquet 同时是数据湖 DeltaLake / Iceberg(可选) 的存储底层
  • HBaseGoogle Bigtable 的开源实现,存储单位为 列族
  • KuduLSM-Tree(Log-Structured Merge Tree) 存储引擎

而 MergeTree 正是基于 LSM 思想构建的。

1.2 LSM-Tree 存储引擎

简要介绍一下 LSM-Tree (Log-Structured Merge-Tree) 与列式存储相结合时的思想。

  • 因为列式存储在写入时需要积攒一定的数据量(写的行数太少体现不出列存优势),因此需要在内存中 Cache 近段时间写入的数据 (Memory Set),然后再刷写到磁盘 (Disk Set)。
  • 想要有比较好的查询性能,需要有一个有序索引,用于 Predicate Pushdown,才可以减少不必要的数据 Scan
  • 写入磁盘的数据都是局部有序的,因此查询时依然需要对每个存量 Disk Set 进行扫描,随着写入的积累,查询性能会急速下降
  • 因此需要定期对磁盘中的 Disk Set 进行 Merge,增强数据的连贯性,减少碎片。Merge 的过程和数据库执行 SortMergeJoin 中的 Merge 阶段是非常相似的。


TIPS: LSM-Tree 并非为了列存设计的,LSM-Tree 主要对标 B-Tree,提升写入性能。但是 LSM-Tree 因为需要将数据 Cache 在内存一段时间以及需要定时对数据进行整理,和列存产生了一些共性。

2. MergeTree 概述

ClickHouse 官方有一个关于 MergeTree 引擎工作的分享 Dive into ClickHouse Storage System

这里摘取重点陈述.

2.1 Create Table DDL

CREATE TABLE mt (
    EventDate Date,
    OrderID Int32,
    BannerID UInt64,
    UserId String,
    GoalNum Int8,

    INDEX UserIdIndex (UserId) TYPE bloom_filter GRANULARITY 4
) ENGINE = MergeTree()
PARTITION BY toYYYYMM(EventDate) 
ORDER BY (OrderID, BannerID)

上面是一个 ClickHouse MergeTree 示例, 相比于传统 OLTP 数据库,MergeTree 有以下不同:

  • 主键是可以重复的, 默认为 ORDER BY 指定的字段,数据会按照主键排序
  • 支持分区

2.2 Storage Layout

  • 每次写入创建一个目录存储数据 (如 201809_2_2_0)
$ ls /var/lib/clickhouse/data/default/mt
201809_2_2_0  201809_3_3_0  201810_1_1_0  201810_4_4_0 201810_1_4_1
detached  format_version.txt
  • 每个字段单独存放一个文件,如 GoalNum.binBannerID.bin
  • 每个字段有一个单独的 Mark 索引, 如 GoalNum.mrk
  • 对于分区信息,有 partition.datminmax_EventDate.idx
  • primary.idx 存放主键索引
$ ls /var/lib/clickhouse/data/default/mt/201810_1_4_1
GoalNum.bin GoalNum.mrk BannerID.bin ...
primary.idx checksums.txt count.txt columns.txt
partition.dat minmax_EventDate.idx

2.3 Index

不同于 B-Tree 和 LSM-Tree 构建索引的方式,ClickHouse 构建了一个非常简单有效的稀疏索引(Sparse Index) primary.idx

如下, ClickHouse 默认每 8192(8K) 行数据,为主键字段创建一行索引数据。


ClickHouse 将 8192 称之为 Index Granularity, 这是一个非常重要的概念。简而言之,Index Granularity 是 ClickHouse 进行数据存储/查询的最小单位。

此外,ClickHouse 为 Column 除了写入 *.bin 数据文件外,还额外建了 *.mrk 索引文件,用于可以快速根据 primary.idx 定位到的 Index 快速定位到 *.bin。简而言之,*.mrk 是 primary.idx 与 *.bin 之间的一座桥。


和 MergeTree Write Path 相关的背景知识介绍到这里,后面开始源码解读部分。

3. MergeTree Write-Path 源码解析

ClickHouse 整体约有 60 余万行 C++ 代码 (仅 src 目录)

~/Documents/master/ClickHouse/src master !17 ?17 ❯ cloc  .                                                                                                                                         00:25:25
    4271 text files.
    4269 unique files.                                          
      25 files ignored.

github.com/AlDanial/cloc v 1.90  T=2.11 s (2019.9 files/s, 368444.2 lines/s)
-------------------------------------------------------------------------------
Language                     files          blank        comment           code
-------------------------------------------------------------------------------
C++                           2250          79043          19631         458480
C/C++ Header                  1946          44246          22895         150382
CMake                           51            304             52           1177
Python                           2             66              3            218
SQL                              4              0              0            159
Protocol Buffers                 1             35             55            107
ANTLR Grammar                    1             15              1            105
Bourne Shell                     4             20             11             63
Markdown                         1              1              0              2
-------------------------------------------------------------------------------
SUM:                          4260         123730          42648         610693
-------------------------------------------------------------------------------

其中 MergeTree 相关有近 4 万行代码 (src/Storages/MergeTree)

这里不包含 MergeTree Merge 策略相关的代码, Merge 部分的代码实现位于 (src/Processors/Merges)

~/Documents/master/ClickHouse/src/Storages/MergeTree master !17 ?17 ❯ cloc  .                                                                                                                      00:28:08
     225 text files.
     225 unique files.                                          
       0 files ignored.

github.com/AlDanial/cloc v 1.90  T=0.14 s (1662.5 files/s, 395988.9 lines/s)
-------------------------------------------------------------------------------
Language                     files          blank        comment           code
-------------------------------------------------------------------------------
C++                            106           6805           2306          31543
C/C++ Header                   117           2789           2005           8139
CMake                            2              0              0              5
-------------------------------------------------------------------------------
SUM:                           225           9594           4311          39687
-------------------------------------------------------------------------------

3.1 MergeTree 代码结构

MergeTree (src/Storages/MergeTree) 主体代码结构如下:

  • IMergeTreeDataPart, 接口: MergeTree Part
  • IMergedBlockOutputStream, 接口: 序列化输出流
  • IMergeTreeDataPartWriter, 接口: MergeTreeData Part Writer
  • MergeTreeDataPart*, MergeTree Part 的实现,包括 Wide、Compact、In-Memory 多种模式
  • MergeTreeDataPartWriter*, MergeTreeData Part 各种模式的 Writer 实现
  • MergeTreeIndex*, MergeTree 各种 Index 的实现 (min-max, set, bloom-filter …)
  • ReplicatedMergeTree*, Replicated MergeTree 相关

3.2 MergeTree Write-Path 整体流程

MergeTree Write 实现位于 MergeTreeSink.cpp, MergeTreeSink::consume().

从 ClickHouse 收到 Insert Query 到达 MergeTreeSink::consume() 经历以下路径:

  • InterpreterInsertQuery.cpp, InterpreterInsertQuery::buildChainImpl()
  • auto sink = table->write(…);
  • IStorage.h, class SinkToStorage
  • virtual SinkToStoragePtr write(…)
  • StorageMergeTree.cpp, SinkToStoragePtr StorageMergeTree::write
  • return std::make_shared(…)
  • MergeTreeSink.cpp, MergeTreeSink::consume(Chunk chunk)

直入重点,我们从 MergeTreeSink::consume() 开始. 下图为整体写入流程, 其中每个步骤都加了编号 Px.x 方便详解。


3.3 MergeTree Write-Path 源码解析

TIPS 这里的代码会加上笔者自己的注释 源码细节比较多,在文中会省略部分次要代码

P0, MergeTreeSink::consume

void MergeTreeSink::consume(Chunk chunk)
{
    auto block = getHeader().cloneWithColumns(chunk.detachColumns());

    // 按 Partition By 子句指定的分区,将 block 拆成每个 Partition 一个 Block, block -> []block

    auto part_blocks = storage.writer.splitBlockIntoParts(block, max_parts_per_block, metadata_snapshot, context);
    for (auto & current_block : part_blocks)
    {
        Stopwatch watch;

        // 每个 Block 创建新的 Part
        // 一个 MergeTree 表包含多个 Part, Part 会在后台定期合并 (Merge)
        // 新建 Part 时会写到 Temp 目录,以防止查询时读到不完整的写入

        MergeTreeData::MutableDataPartPtr part = storage.writer.writeTempPart(current_block, metadata_snapshot, context);

        /// If optimize_on_insert setting is true, current_block could become empty after merge
        /// and we didn't create part.
        if (!part)
            continue;

        // 挂载 Temp Part 到表空间下

        /// Part can be deduplicated, so increment counters and add to part log only if it's really added
        if (storage.renameTempPartAndAdd(part, &storage.increment, nullptr, storage.getDeduplicationLog()))
        {
            // 记录 part metrics 到 system.part_log 表
            PartLog::addNewPart(storage.getContext(), part, watch.elapsed());

            // 触发后台 Merge 任务

            /// Initiate async merge - it will be done if it's good time for merge and if there are space in 'background_pool'.
            storage.background_operations_assignee.trigger();
        }
    }
}

可以看到 MergeTreeSink::consume 主要包含四个步骤:

  • P1, 将 Block 按照 Partition 拆成 N 个 Block
  • P2, 写入 Part 到 Temp 目录防止 Dirty Read
  • P3, 将 Temp Part 挂载到表空间下, 这样便可以被客户端查询到数据
  • P4, 触发一些后台执行的任务 (例如执行 Merge)

后续对每个步骤分开阐述。

P1, MergeTreeDataWriter::splitBlockIntoParts

BlocksWithPartition MergeTreeDataWriter::splitBlockIntoParts(
        const Block & block, size_t max_parts, const StorageMetadataPtr & metadata_snapshot, ContextPtr context)
{
    // 省略 ...

    // 未分区时, 快速跳过返回
    if (!metadata_snapshot->hasPartitionKey()) /// Table is not partitioned.
    {
        result.emplace_back(Block(block), Row{});
        return result;
    }

    Block block_copy = block;

    // executePartitionByExpression 对 Block 执行 MergeTree Partition By 子句, 并且将新增的 key 字段添加到 block_copy 中
    // partition_key_names_and_types 仅包含分区相关字段

    /// After expression execution partition key columns will be added to block_copy with names regarding partition function.
    auto partition_key_names_and_types = MergeTreePartition::executePartitionByExpression(metadata_snapshot, block_copy, context);

    ColumnRawPtrs partition_columns;
    partition_columns.reserve(partition_key_names_and_types.size());
    for (const auto & element : partition_key_names_and_types)
        partition_columns.emplace_back(block_copy.getByName(element.name).column.get());

    // buildScatterSelector 建立了 row_id -> partition_id 之间的映射
    // selector 等价于 []int 类型, selector[row_id] = partition_id
    PODArray<size_t> partition_num_to_first_row;
    IColumn::Selector selector;
    buildScatterSelector(partition_columns, partition_num_to_first_row, selector, max_parts);

    // 省略 ...

    // IColumn::scatter 算子可以将一个 Column 一拆多
    // 对每个 Column 一拆多后,组合为多个 Block
    for (size_t col = 0; col < block.columns(); ++col)
    {
        MutableColumns scattered = block.getByPosition(col).column->scatter(partitions_count, selector);
        for (size_t i = 0; i < partitions_count; ++i)
            result[i].block.getByPosition(col).column = std::move(scattered[i]);
    }

    return result;
}

我们看到 splitBlockIntoParts 有下面几个关键步骤:

  • P1.1, 通过 executePartitionByExpression() 计算出与 partition 相关的字段 (可能会新增字段)
  • P1.2, 通过 buildScatterSelector() 计算出 row 与 partition 之间的映射关系
  • P1.3, 通过 IColumn::scatter() 将每个 Column 都完成一拆多, 最终组合为多个 Block

P2, MergeTreeDataWriter::writeTempPart

MergeTreeDataWriter::writeTempPart 是写入的具体实现,我们会详细说明这一部分。

MergeTreeData::MutableDataPartPtr MergeTreeDataWriter::writeTempPart(
    BlockWithPartition & block_with_partition, const StorageMetadataPtr & metadata_snapshot, ContextPtr context)
{
    Block & block = block_with_partition.block;
    static const String TMP_PREFIX = "tmp_insert_";

    // 生成一个 Part ID, 每一个新的 Part 插入都会生成一个自增的 Part ID
    /// This will generate unique name in scope of current server process.
    Int64 temp_index = data.insert_increment.get();

    // 计算 partition 相关字段的 min-max 统计
    auto minmax_idx = std::make_shared<IMergeTreeDataPart::MinMaxIndex>();
    minmax_idx->update(block, data.getMinMaxColumnsNames(metadata_snapshot->getPartitionKey()));

    MergeTreePartition partition(std::move(block_with_partition.partition));

    MergeTreePartInfo new_part_info(partition.getID(metadata_snapshot->getPartitionKey().sample_block), temp_index, temp_index, 0);
    String part_name;
    if (data.format_version < MERGE_TREE_DATA_MIN_FORMAT_VERSION_WITH_CUSTOM_PARTITIONING)
    {
        // 省略, 这里为旧版 MergeTree 格式 ... 
    }
    else
        part_name = new_part_info.getPartName();

    /// If we need to calculate some columns to sort.
    if (metadata_snapshot->hasSortingKey() || metadata_snapshot->hasSecondaryIndices())
        // SORT BY toYYYYMM(time) 这种情况需要计算 Expression 的值
        data.getSortingKeyAndSkipIndicesExpression(metadata_snapshot)->execute(block);

    // 省略 ... 

    ProfileEvents::increment(ProfileEvents::MergeTreeDataWriterBlocks);

    /// Sort
    IColumn::Permutation * perm_ptr = nullptr;
    IColumn::Permutation perm;
    if (!sort_description.empty())
    {
        // isAlreadySorted 仅对 Block 未排序情况下进行排序
        if (!isAlreadySorted(block, sort_description))
        {
            // stableGetPermutation 为稳定排序(尽可能保持插入顺序), 实现为 std::stable_sort
            // 注意这里并未对所有列都进行了排序, 而是建立了原始数据与排序数据 row_id 的映射
            stableGetPermutation(block, sort_description, perm);
            perm_ptr = &perm;
        }
        else
            ProfileEvents::increment(ProfileEvents::MergeTreeDataWriterBlocksAlreadySorted);
    }

    // 省略 ... 

    // updateTTL 更新 TTL 信息, TTL 为 MergeTree 提供的数据生命周期管理功能
    // 记录当前 Part 与 TTL 相关字段的 min,max 统计,用于后续方便快速判断一个 Part 是否满足 TTL 条件
    for (const auto & ttl_entry : move_ttl_entries)
        updateTTL(ttl_entry, move_ttl_infos, move_ttl_infos.moves_ttl[ttl_entry.result_column], block, false);

    // 省略 ... 

    // createPart
    auto new_data_part = data.createPart(
        part_name,
        // 注意 choosePartType 会按照 Block 大小和行数决定是否使用 Compact/Memory 存储方式
        data.choosePartType(expected_size, block.rows()),
        new_part_info,
        createVolumeFromReservation(reservation, volume),
        TMP_PREFIX + part_name);

    // 省略 ... 

    SyncGuardPtr sync_guard;
    if (new_data_part->isStoredOnDisk())
    {
        // 省略 ... 

        // sync_guard 会在析构函数执行时完成目录 Sync 到磁盘
        if (data.getSettings()->fsync_part_directory)
            sync_guard = disk->getDirectorySyncGuard(full_path);
    }

    // 省略, 记录额外的 TTL 信息 ...
    // [TTL expr
    //   [DELETE|TO DISK 'xxx'|TO VOLUME 'xxx' [, ...] ]
    //   [WHERE conditions]
    //   [GROUP BY key_expr [SET v1 = aggr_func(v1) [, v2 = aggr_func(v2) ...]] ] ] 
    new_data_part->ttl_infos.update(move_ttl_infos);

    /// This effectively chooses minimal compression method:
    ///  either default lz4 or compression method with zero thresholds on absolute and relative part size.
    auto compression_codec = data.getContext()->chooseCompressionCodec(0, 0);

    // MergedBlockOutputStream 将 Block 序列化到磁盘
    const auto & index_factory = MergeTreeIndexFactory::instance();
    MergedBlockOutputStream out(new_data_part, metadata_snapshot,columns,
        index_factory.getMany(metadata_snapshot->getSecondaryIndices()), compression_codec);

    bool sync_on_insert = data_settings->fsync_after_insert;

    // 写入数据主体, Columns / Indexs
    out.writeWithPermutation(block, perm_ptr);

    // 处理 PROJECTION 字段, PROJECTION projection_name_1 (SELECT <COLUMN LIST EXPR> [GROUP BY] [ORDER BY])
    for (const auto & projection : metadata_snapshot->getProjections())
    {
        auto projection_block = projection.calculate(block, context);
        if (projection_block.rows())
            new_data_part->addProjectionPart(
                projection.name, writeProjectionPart(data, log, projection_block, projection, new_data_part.get()));
    }

    // 写入收尾, Checksums、ttl info 等信息
    out.writeSuffixAndFinalizePart(new_data_part, sync_on_insert);

    // 省略, 添加写入指标 ...

    return new_data_part;
}

我们看到 writeTempPart 整体的逻辑还是比较琐碎的,上面已经省略了很多细节,整体来说,分为以下步骤:

  • P2.1, minmax_idx->update(…) 对 Partition 涉及的字段统计 min-max 值,作为额外的谓词下推索引
  • P2.2, stableGetPermutation() 对 Block 数据按照 Order By 字段排序,这里有两个细节
  • 会预先检查是否排序,因此如果数据已经排过序再写入,事实上写入速度会有提升
  • stableGetPermutation 为稳定排序, 底层实现为 std::stable_sort,时间复杂度为 O(N((logN)^2))
  • P2.3, updateTTL(…) 是为支持 TTL 数据生命周期管理做的数据 min-max 索引,用于快速判断一个 Part 是否命中 TTL
  • P2.4, MergeTreeData::createPart 创建 Part 实例
  • 注意 choosePartType() 会按照 Block 大小和行数决定是否使用 Compact/Memory 存储方式,默认为 Wide 方式存储
  • 本文重点讨论 Wide (即列式) 存储方式
  • P2.5, MergedBlockOutputStream::writeWithPermutation, 实现 Block 数据的写入
  • 后文详细介绍这一部分
  • P2.6, MergedBlockOutputStream::writeSuffixAndFinalizePart, 进行一系列的收尾工作
  • 统计各个文件的 checksum,写入到 checksums.txt,所有文件的 checksum 记录到一个文件
  • 写入 TTL info 信息,写入到 ttl.txt
  • 写入 Part 总行数写入到 count.txt
  • 所有字段信息写入到 columns.txt

P2.5, MergedBlockOutputStream::writeWithPermutation

代码清单: src/Storages/MergeTree/MergedBlockOutputStream.cpp

void MergedBlockOutputStream::writeImpl(const Block & block, const IColumn::Permutation * permutation)
{
    // Check 各个列行数相同
    block.checkNumberOfRows();
    size_t rows = block.rows();
    if (!rows)
        return;

    // 调用具体的 MergeTreeDataPartWriter 实现
    // 后文以 MergeTreeDataPartWriterWide.cpp 为例
    writer->write(block, permutation);
    if (reset_columns)
        new_serialization_infos.add(block);

    rows_count += rows;
}
  • checkNumberOfRows() 做了保底检查,确保各个 Column 的行数是相同的
  • writer->write(block, permutation) 调用之前 data.createPart() 决定的 Writer 实例
  • 可能是 MergeTreeDataPartWriterWide、MergeTreeDataPartWriterCompact、MergeTreeDataPartWriterInMemory 中的一个
  • 细节见 MergeTreeData::choosePartType, src/Storages/MergeTree/MergeTreeData.cpp
  • 后文以 MergeTreeDataPartWriterWide 举例

P2.5.2 MergeTreeDataPartWriterWide::write

代码清单: src/Storages/MergeTree/MergeTreeDataPartWriterWide.cpp

void MergeTreeDataPartWriterWide::write(const Block & block, const IColumn::Permutation * permutation)
{
    /// Fill index granularity for this block
    /// if it's unknown (in case of insert data or horizontal merge,
    /// but not in case of vertical part of vertical merge)
    // 在插入数据是,compute_granularity 默认为 true
    // index_granularity 含义见第二节的介绍
    if (compute_granularity)
    {
        // 计算出此 Part 对应的 index_granularity
        size_t index_granularity_for_block = computeIndexGranularity(block);

        // 省略 ...

        // 根据 index_granularity_for_block,计算每个 granular 对应的 row 范围
        fillIndexGranularity(index_granularity_for_block, block.rows());
    }

    Block block_to_write = block;

    auto granules_to_write = getGranulesToWrite(index_granularity, block_to_write.rows(), getCurrentMark(), rows_written_in_last_mark);

    auto offset_columns = written_offset_columns ? *written_offset_columns : WrittenOffsetColumns{};
    Block primary_key_block;
    if (settings.rewrite_primary_key)
        primary_key_block = getBlockAndPermute(block, metadata_snapshot->getPrimaryKeyColumns(), permutation);

    // 将所有 Column 排序
    Block skip_indexes_block = getBlockAndPermute(block, getSkipIndicesColumns(), permutation);

    auto it = columns_list.begin();
    for (size_t i = 0; i < columns_list.size(); ++i, ++it)
    {
        auto & column = block_to_write.getByName(it->name);

        if (data_part->getSerialization(*it)->getKind() != ISerialization::Kind::SPARSE)
            column.column = recursiveRemoveSparse(column.column);

        if (permutation)
        {
            if (primary_key_block.has(it->name))
            {
                const auto & primary_column = *primary_key_block.getByName(it->name).column;
                writeColumn(*it, primary_column, offset_columns, granules_to_write);
            }
            else if (skip_indexes_block.has(it->name))
            {
                const auto & index_column = *skip_indexes_block.getByName(it->name).column;
                writeColumn(*it, index_column, offset_columns, granules_to_write);
            }
            else
            {
                /// We rearrange the columns that are not included in the primary key here; Then the result is released - to save RAM.
                ColumnPtr permuted_column = column.column->permute(*permutation, 0);
                writeColumn(*it, *permuted_column, offset_columns, granules_to_write);
            }
        }
        else
        {
            // writeColumn 执行最终的写入
            // 后文详细说明写入过程
            writeColumn(*it, *column.column, offset_columns, granules_to_write);
        }
    }

    if (settings.rewrite_primary_key)
        // calculateAndSerializePrimaryIndex 写入主键索引 primary.idx
        calculateAndSerializePrimaryIndex(primary_key_block, granules_to_write);

    // calculateAndSerializeSkipIndices 写入 Column 对应的二级索引
    calculateAndSerializeSkipIndices(skip_indexes_block, granules_to_write);

    shiftCurrentMark(granules_to_write);
}
  • MergeTreeDataPartWriterWide::write 实现 MergeTree 以 Wide 形式写入
  • 首先由 computeIndexGranularity() 计算当前 Block 的 IndexGranularity
  • 将所有 Column 按照 Primary key 排序,用的是之前在 writeTempPart() 构造的 permutation
  • writeColumn 将每个 Column 分别写入磁盘,后面我们详细介绍这个过程
  • calculateAndSerializePrimaryIndex、calculateAndSerializeSkipIndices 写入主键、二级索引

P2.5.3 computeIndexGranularity

代码清单: src/Storages/MergeTree/MergeTreeDataPartWriterOnDisk.cpp

static size_t computeIndexGranularityImpl(
    const Block & block,
    size_t index_granularity_bytes,
    size_t fixed_index_granularity_rows,
    bool blocks_are_granules,
    bool can_use_adaptive_index_granularity)
{
    size_t rows_in_block = block.rows();
    size_t index_granularity_for_block;
    if (!can_use_adaptive_index_granularity)
        // fixed_index_granularity_rows 来自于 Setting 配置 index_granularity
        index_granularity_for_block = fixed_index_granularity_rows;
    else
    {
        size_t block_size_in_memory = block.bytes();
        if (blocks_are_granules)
            index_granularity_for_block = rows_in_block;
        else if (block_size_in_memory >= index_granularity_bytes)
        {
            // 按照 index_granularity_bytes 计算每个 Granular 需要多少行
            size_t granules_in_block = block_size_in_memory / index_granularity_bytes;
            index_granularity_for_block = rows_in_block / granules_in_block;
        }
        else
        {
            size_t size_of_row_in_bytes = std::max(block_size_in_memory / rows_in_block, 1UL);
            index_granularity_for_block = index_granularity_bytes / size_of_row_in_bytes;
        }
    }
    if (index_granularity_for_block == 0) /// very rare case when index granularity bytes less then single row
        index_granularity_for_block = 1;

    /// We should be less or equal than fixed index granularity
    index_granularity_for_block = std::min(fixed_index_granularity_rows, index_granularity_for_block);
    return index_granularity_for_block;
}
  • 这里我们可以看到计算 Index Granularity 的细节
  • 当配置了 index_granularity_bytes 时,会按照 block.bytes() 统计的 Block 字节数来决定一个 Granular 具体说多少行

代码清单: src/Storages/MergeTree/IMergeTreeDataPartWriter.cpp

Block getBlockAndPermute(const Block & block, const Names & names, const IColumn::Permutation * permutation)
{
    Block result;
    for (size_t i = 0, size = names.size(); i < size; ++i)
    {
        const auto & name = names[i];
        result.insert(i, block.getByName(name));

        /// Reorder primary key columns in advance and add them to `primary_key_columns`.
        if (permutation)
        {
            auto & column = result.getByPosition(i);
            // 执行对 Column 的排序
            column.column = column.column->permute(*permutation, 0);
        }
    }

    return result;
}
  • column->permute(...) 执行对 Column 的排序

P2.5.4 MergeTreeDataPartWriterWide::writeColumn

代码清单: src/Storages/MergeTree/MergeTreeDataPartWriterWide.cpp

void MergeTreeDataPartWriterWide::writeColumn(
    const NameAndTypePair & name_and_type,
    const IColumn & column,
    WrittenOffsetColumns & offset_columns,
    const Granules & granules)
{
    // 省略 ...

    if (inserted)
    {
        ISerialization::SerializeBinaryBulkSettings serialize_settings;
        serialize_settings.getter = createStreamGetter(name_and_type, offset_columns);
        serialization->serializeBinaryBulkStatePrefix(serialize_settings, it->second);
    }

    // 省略 ...

    for (const auto & granule : granules)
    {
        // 省略 ...

        // 写入单个 Granule 到 xxx.bin
        writeSingleGranule(
           name_and_type,
           column,
           offset_columns,
           it->second,
           serialize_settings,
           granule
        );

        if (granule.is_complete)
        {
            // 省略 ...

            for (const auto & mark : marks_it->second)
                // 写入 Column 对应的 .mrk 索引文件
                flushMarkToFile(mark, index_granularity.getMarkRows(granule.mark_number));
            // 省略 ...
        }

        // 省略 ...
    }

    // 省略 ...
}
  • 对 Column 中的每个 granule 分别执行
  • writeSingleGranule() 写入 Column 内容到 .bin
  • flushMarkToFile() 写入 Column .mrk 索引
  • granule 是存储/读取的基础单位
  • 细节如下图所示


代码清单: src/Storages/MergeTree/MergeTreeDataPartWriterWide.cpp

void MergeTreeDataPartWriterWide::writeSingleGranule(
    const NameAndTypePair & name_and_type,
    const IColumn & column,
    WrittenOffsetColumns & offset_columns,
    ISerialization::SerializeBinaryBulkStatePtr & serialization_state,
    ISerialization::SerializeBinaryBulkSettings & serialize_settings,
    const Granule & granule)
{
    // 获得字段对应的序列化实例
    const auto & serialization = data_part->getSerialization(name_and_type);
    // 调用 ISerialization::serializeBinaryBulk() 完成字段序列化
    serialization->serializeBinaryBulkWithMultipleStreams(column, granule.start_row, granule.rows_to_write, serialize_settings, serialization_state);

    // 省略 ...
}
  • getSerialization() 得到数据类型对应的 serialization
  • 调用 ISerialization::serializeBinaryBulk() 完成序列化
  • 下面以 String 类型为例

代码清单: src/DataTypes/Serializations/SerializationString.cpp

void SerializationString::serializeBinaryBulk(const IColumn & column, WriteBuffer & ostr, size_t offset, size_t limit) const
{
    const ColumnString & column_string = typeid_cast<const ColumnString &>(column);
    const ColumnString::Chars & data = column_string.getChars();            // 将所有字符串拼接起来
    const ColumnString::Offsets & offsets = column_string.getOffsets();     // 可用来得到每个 String 在 data 中的 Offset
    // 在实际存储中,offsets 为 Maps i'th position to offset to i+1'th element. Last offset maps to the end of all chars (is the size of all chars).

    // 省略 ...

    if (offset == 0)
    {
        UInt64 str_size = offsets[0] - 1;
        writeVarUInt(str_size, ostr);   // 写入第一个 String 的长度
        ostr.write(reinterpret_cast<const char *>(data.data()), str_size);    // 写入第一个 String 内容

        ++offset;
    }

    for (size_t i = offset; i < end; ++i)
    {
        UInt64 str_size = offsets[i] - offsets[i - 1] - 1; 
        writeVarUInt(str_size, ostr);    // 继续写入后续 String 的长度
        ostr.write(reinterpret_cast<const char *>(&data[offsets[i - 1]]), str_size); // 继续写入后续 String 的内容
    }
}
  • 我们可以看到 ColumnString 中的多个 String Value 是连续组织的,使用 Offsets 来记录不同的 String 边界。
  • 序列化时,对每个 String Value 先写入长度,再写入 String 内容,这是最常用的 String 序列化方法
  • writeVarUInt() 并非固定写入 4 字节,而是 variable-length quantity(VLQ) 变长编码方式,每个字节最高位标识是否还有后续字节,细节示例如下图
  • 注意这里是写入到 WriteBuffer 中,真正落地到磁盘还会经过一次压缩


至此我们已经从插入数据最上层的 InterpreterInsertQuery,到了最底层的 SerializationString::serializeBinaryBulk 实现 String 的序列化。剩下的细节还有很多,例如 Compact 格式、各种 Index、Prejection、renameTempPartAndAdd 的实现等,大家可以对照源码进一步探索。

优秀源码赏析

这里着重介绍实现优秀的源码。

代码清单: src/Interpreters/sortBlock.cpp

bool isAlreadySorted(const Block & block, const SortDescription & description)
{
    // 省略 ...

    /** If the rows are not too few, then let's make a quick attempt to verify that the block is not sorted.
     * Constants - at random.
     */

    // 抽样 10 个数(等距离分散采样),快速检查是否排好序
    // 如果已经排好序,只需要 O(N) 的代价即可完成排序
    // 如果尚未排好序,这十个数的检查代价也可以接受
    // 这是一个非常好的面向常见特殊场景优化的例子
    static constexpr size_t num_rows_to_try = 10;
    if (rows > num_rows_to_try * 5)
    {
        for (size_t i = 1; i < num_rows_to_try; ++i)
        {
            size_t prev_position = rows * (i - 1) / num_rows_to_try;
            size_t curr_position = rows * i / num_rows_to_try;

            if (less(curr_position, prev_position))
                return false;
        }
    }

    for (size_t i = 1; i < rows; ++i)
        if (less(i, i - 1))
            return false;

    return true;
}
  • 面向特殊场景优化,是贯穿 ClickHouse 各个时期的开发哲学
  • 类似的面向场景优化还有: uniqCombined 聚合函数、quantileTiming 聚合函数 等等

代码清单: src/Disks/LocalDirectorySyncGuard.cpp

LocalDirectorySyncGuard::~LocalDirectorySyncGuard()
{
    try
    {
#if defined(OS_DARWIN)
        if (fcntl(fd, F_FULLFSYNC, 0))
            throwFromErrno("Cannot fcntl(F_FULLFSYNC)", ErrorCodes::CANNOT_FSYNC);
#else
        if (-1 == ::fdatasync(fd))
            throw Exception("Cannot fdatasync", ErrorCodes::CANNOT_FSYNC);
#endif
        if (-1 == ::close(fd))
            throw Exception("Cannot close file", ErrorCodes::CANNOT_CLOSE_FILE);
    }
    catch (...)
    {
        tryLogCurrentException(__PRETTY_FUNCTION__);
    }
}
  • LocalDirectorySyncGuard 在析构函数执行时完成对目录的 Sync 刷写
  • new LocalDirectorySyncGuard 对象后,超出变量作用域即可自动调用析构函数完成IO同步到磁盘
  • 与 Golang 语言的 Defer 语句有异曲同工之妙

4. 总结

MergeTree Write-path 过程中的耗时主要分布于:

  • 对 Partition By 相关字段进行 Hash 映射为 partition
  • 对 Block 按照 Sort By 子句排序
  • 统计 TTL 信息
  • 序列化/写入数据数据到磁盘
  • 写入 Primary、Secondary 索引

性能建议:

  • 如果想要提高写入性能,可以提前对数据按照 MergeTree SORT BY 进行排序后再插入
  • 尽量不在一次数据插入中涉及两个 Partition,Block 中的数据会按照 Partition 拆分并且分多个批次顺序写入
  • ClickHouse 为支持 TTL 功能,在数据插入时做了大量的工作
  • ClickHouse 的一次数据插入需要做大量的工作(后续还有后台Merge),因此降低插入频率,一次尽可能插入数万条数据以上 (考虑到索引粒度默认已经是 8192)

5. 参考文献


语法树生成及执行涉及的UML图

在这里插入图片描述

HTTP Handler 接收Query请求
调用
Interpreters::executeQuery.h::executeQuery(…)
调用
Interpreters::executeQuery.h::executeQueryImpl(…)
生成
ASTPtr ast = Parsers::ParserQuery::parseImpl(…)

using ASTPtr = std::shared_ptr<IAST>
IAST是所有SQL语句解析后,生成的抽象语法树的公共接口,例如可以生成一个ASTSelectWithUnionQuery类型的语法树。

生成
auto interpreter = InterpreterFactory::get(ast, context, stage);

封装ASTPtr为IInterpreter,例如Query语句会封装成一个InterpreterSelectQuery类的对象,在生成此对象的实例时,也会对这个AST做一些简单的分析和优化,例如PREWHERE和WHERE的调整、输入数据的类型推断等。

BlockIO res = interpreter->execute();

BlockIO封装了当前QueryPipeline实例,以及相应的输入、输出流的指针,方便根据Pipeline中的每一个IProcessor实例的状态,触发流的读写以及注册流上的事件,比如Query工作流完成事件。

BlockIO InterpreterSelectQuery::execute()
{
    BlockIO res;
    QueryPlan query_plan;

    buildQueryPlan(query_plan);

    res.pipeline = std::move(*query_plan.buildQueryPipeline());
    return res;
}
  • 1
  • 2
  • 3
  • 4
  • 5
  • 6
  • 7
  • 8
  • 9
  • 10

聚合函数读取数据及执行过程

以uniq(…)方法为例,简单讲述聚合函数执行add(…)方法的过程:
Aggregator::executeOnBlock(…)
调用
Aggregator::executeWithoutKeyImpl(…)
调用
AggregateFunctionInstruction::IAggregateFunction::addBatchSinglePlace(…)
调用
IAggregateFunction::addBatchSinglePlace(…)
调用具体子类的
AggregateFunctionUniq::add(AggregateDataPtr place, const IColumn ** columns, size_t row_num, Arena * arena)

这个方法可以用来聚合所有的数据,
对于聚合操作,在解析计划树时,会向Pipeline中添加一个MergingAggregatedStep,用于将所有处理后的数据聚合成一个Block。

如果所有的Blocks都在自己的数据集上聚合完成,MergingAggregatedStep中选择使用不同的Transformer来完成所有已经聚合了的Block间的聚合操作,例如如果在内存充足的情况下,可以基于内存作排序,最终返回排序且聚合的一个Block;如果不足则使用Merge-sort过程,通过溢出文件的方式完成聚合。

Select Query语句的Parse过程

从SELECT语句到AST Node的过程,使用Parser*前缀的类完成。

假设有一个如下的QUERY语句:

SELECT a FROM testdb.test_tbl WHERE dt='20210501'
  • 1

TCPHandler类

以TCP传输模式接收客户端的消息,这里指处理SQL语句的Server端类,它的核心方法如下:

void TCPHandler::runImpl() {
// 配置Socket

// 检查消息体

// Authenticaiton查检及配置

    Settings connection_settings = connection_context.getSettings();

    sendHello();

    connection_context.setProgressCallback([this] (const Progress & value) { return this->updateProgress(value); });

    while (true)
    {
        /// We are waiting for a packet from the client. Thus, every `poll_interval` seconds check whether we need to shut down.
        {
            Stopwatch idle_time;
            while (!server.isCancelled() && !static_cast<ReadBufferFromPocoSocket &>(*in).poll(
                std::min(connection_settings.poll_interval, connection_settings.idle_connection_timeout) * 1000000))
            {
                if (idle_time.elapsedSeconds() > connection_settings.idle_connection_timeout)
                {
                    LOG_TRACE(log, "Closing idle connection");
                    return;
                }
            }
        }

        /// If we need to shut down, or client disconnects.
        if (server.isCancelled() || in->eof())
            break;

        /// Set context of request.
        query_context = connection_context;

        Stopwatch watch;
        state.reset();

        /// Initialized later.
        std::optional<CurrentThread::QueryScope> query_scope;

        /** An exception during the execution of request (it must be sent over the network to the client).
         *  The client will be able to accept it, if it did not happen while sending another packet and the client has not disconnected yet.
         */
        std::optional<DB::Exception> exception;
        bool network_error = false;

        bool send_exception_with_stack_trace = true;

        try
        {
            /// If a user passed query-local timeouts, reset socket to initial state at the end of the query
            SCOPE_EXIT({state.timeout_setter.reset();});

            /** If Query - process it. If Ping or Cancel - go back to the beginning.
             *  There may come settings for a separate query that modify `query_context`.
             */
            if (!receivePacket())
                continue;

            query_scope.emplace(*query_context);

            send_exception_with_stack_trace = query_context->getSettingsRef().calculate_text_stack_trace;

            /// Should we send internal logs to client?
            const auto client_logs_level = query_context->getSettingsRef().send_logs_level;
            
            /// 配置query执行时的上下文环境,例如setExternalTablesInitializer,setInputInitializer等
            ...

            customizeContext(*query_context);

            bool may_have_embedded_data = client_tcp_protocol_version >= DBMS_MIN_REVISION_WITH_CLIENT_SUPPORT_EMBEDDED_DATA;
            /// 开始执行Query语句,从解析到后生成物理计划树
            state.io = executeQuery(state.query, *query_context, false, state.stage, may_have_embedded_data);
			// 开始监听过程
            after_check_cancelled.restart();
            after_send_progress.restart();

            if (state.io.out)
            {
                state.need_receive_data_for_insert = true;
                processInsertQuery(connection_settings);
            }
            else if (state.need_receive_data_for_input) // It implies pipeline execution
            {
            	// 在这里调用executeQuery返回的结果,触发Pipeline的执行
                /// It is special case for input(), all works for reading data from client will be done in callbacks.
                auto executor = state.io.pipeline.execute();
                executor->execute(state.io.pipeline.getNumThreads());
            }
            else if (state.io.pipeline.initialized())
                processOrdinaryQueryWithProcessors();
            else if (state.io.in)
                processOrdinaryQuery();
			// 执行完成后的收尾工作
            state.io.onFinish();

            /// Do it before sending end of stream, to have a chance to show log message in client.
            query_scope->logPeakMemoryUsage();

            if (state.is_connection_closed)
                break;

            sendLogs();
            sendEndOfStream();

            /// QueryState should be cleared before QueryScope, since otherwise
            /// the MemoryTracker will be wrong for possible deallocations.
            /// (i.e. deallocations from the Aggregator with two-level aggregation)
            state.reset();
            query_scope.reset();
        }
        catch (const Exception & e)
        { ... /// 处理各种异常 }
        catch (...)
        {
            state.io.onException();
            exception.emplace("Unknown exception", ErrorCodes::UNKNOWN_EXCEPTION);
        }
		/// 处理QUERY执行后的收尾工作,例如发送日志和清理各种执行时的环境信息
		... 

        watch.stop();

        LOG_DEBUG(log, "Processed in {} sec.", watch.elapsedSeconds());

        /// It is important to destroy query context here. We do not want it to live arbitrarily longer than the query.
        query_context.reset();

        if (network_error)
            break;
    }

}
  • 1
  • 2
  • 3
  • 4
  • 5
  • 6
  • 7
  • 8
  • 9
  • 10
  • 11
  • 12
  • 13
  • 14
  • 15
  • 16
  • 17
  • 18
  • 19
  • 20
  • 21
  • 22
  • 23
  • 24
  • 25
  • 26
  • 27
  • 28
  • 29
  • 30
  • 31
  • 32
  • 33
  • 34
  • 35
  • 36
  • 37
  • 38
  • 39
  • 40
  • 41
  • 42
  • 43
  • 44
  • 45
  • 46
  • 47
  • 48
  • 49
  • 50
  • 51
  • 52
  • 53
  • 54
  • 55
  • 56
  • 57
  • 58
  • 59
  • 60
  • 61
  • 62
  • 63
  • 64
  • 65
  • 66
  • 67
  • 68
  • 69
  • 70
  • 71
  • 72
  • 73
  • 74
  • 75
  • 76
  • 77
  • 78
  • 79
  • 80
  • 81
  • 82
  • 83
  • 84
  • 85
  • 86
  • 87
  • 88
  • 89
  • 90
  • 91
  • 92
  • 93
  • 94
  • 95
  • 96
  • 97
  • 98
  • 99
  • 100
  • 101
  • 102
  • 103
  • 104
  • 105
  • 106
  • 107
  • 108
  • 109
  • 110
  • 111
  • 112
  • 113
  • 114
  • 115
  • 116
  • 117
  • 118
  • 119
  • 120
  • 121
  • 122
  • 123
  • 124
  • 125
  • 126
  • 127
  • 128
  • 129
  • 130
  • 131
  • 132
  • 133
  • 134
  • 135
  • 136

上面的方法中executeQuery(...)是query语句的入口,它的实现类在executeQuery.cpp文件中。

QueryProcessingStage

Query语句执行的阶段,它定义在QueryProcessingStage.h文件中,如下:

/// Up to what stage the SELECT query is executed or needs to be executed.
namespace QueryProcessingStage
{
    /// Numbers matter - the later stage has a larger number.
    ///
    /// It is part of Protocol ABI, add values only to the end.
    /// Also keep in mind that the code may depends on the order of fields, so be double aware when you will add new values.
    enum Enum
    {
        /// Only read/have been read the columns specified in the query.
        FetchColumns       = 0,
        /// Until the stage where the results of processing on different servers can be combined.
        WithMergeableState = 1,
        /// Completely.
        Complete           = 2,
        /// Until the stage where the aggregate functions were calculated and finalized.
        ///
        /// It is used for auto distributed_group_by_no_merge optimization for distributed engine.
        /// (See comments in StorageDistributed).
        WithMergeableStateAfterAggregation = 3,

        MAX = 4,
    };
}
  • 1
  • 2
  • 3
  • 4
  • 5
  • 6
  • 7
  • 8
  • 9
  • 10
  • 11
  • 12
  • 13
  • 14
  • 15
  • 16
  • 17
  • 18
  • 19
  • 20
  • 21
  • 22
  • 23
  • 24

executeQuery.cpp

下面的方法是在TCPHandler.cpp文件中的runImp()方法中调用的,用来执行一条query语句。

BlockIO executeQuery(
    // query语句字符串,例如select语句、insert语句、create语句等
    const String & query,
    // 上下文管理器,是从TCPHandler方法中connection_context中得到的,里面存放了各种在Query运行时可配置的参数信息
    Context & context,
    bool internal,
    // query语句的执行状态
    QueryProcessingStage::Enum stage,
    // 如果是Insert语句的话,待插入的数据是跟在Insert语句之后的,如果没有话,就不是一条insert语句
    bool may_have_embedded_data)
{
    ASTPtr ast;
    BlockIO streams;
    std::tie(ast, streams) = executeQueryImpl(query.data(), query.data() + query.size(), context,
        internal, stage, !may_have_embedded_data, nullptr);

    if (const auto * ast_query_with_output = dynamic_cast<const ASTQueryWithOutput *>(ast.get()))
    {
        String format_name = ast_query_with_output->format
                ? getIdentifierName(ast_query_with_output->format)
                : context.getDefaultFormat();

        if (format_name == "Null")
            streams.null_format = true;
    }

    return streams;
}
  • 1
  • 2
  • 3
  • 4
  • 5
  • 6
  • 7
  • 8
  • 9
  • 10
  • 11
  • 12
  • 13
  • 14
  • 15
  • 16
  • 17
  • 18
  • 19
  • 20
  • 21
  • 22
  • 23
  • 24
  • 25
  • 26
  • 27
  • 28

executeQuery(…)方法又是调用如下方法完成工作的:

static std::tuple<ASTPtr, BlockIO> executeQueryImpl(
    const char * begin,
    const char * end,
    Context & context,
    bool internal,
    QueryProcessingStage::Enum stage,
    bool has_query_tail,
    ReadBuffer * istr)
{
    const auto current_time = std::chrono::system_clock::now();

    /// If we already executing query and it requires to execute internal query, than
    /// don't replace thread context with given (it can be temporary). Otherwise, attach context to thread.
    if (!internal)
    {
        context.makeQueryContext();
        CurrentThread::attachQueryContext(context);
    }

    const Settings & settings = context.getSettingsRef();
    /// 实例化一个ParserQuery对象,用来解析SQL语句,并生成一棵AST树
    ParserQuery parser(end);
    ASTPtr ast;
    const char * query_end;

    /// Don't limit the size of internal queries.
    size_t max_query_size = 0;
    if (!internal)
        max_query_size = settings.max_query_size;

    try
    {
        /// TODO Parser should fail early when max_query_size limit is reached.
        ast = parseQuery(parser, begin, end, "", max_query_size, settings.max_parser_depth);

        /// Interpret SETTINGS clauses as early as possible (before invoking the corresponding interpreter),
        /// to allow settings to take effect.
        if (const auto * select_query = ast->as<ASTSelectQuery>())
        {
            if (auto new_settings = select_query->settings())
                InterpreterSetQuery(new_settings, context).executeForCurrentContext();
        }
        else if (const auto * select_with_union_query = ast->as<ASTSelectWithUnionQuery>())
        {
            if (!select_with_union_query->list_of_selects->children.empty())
            {
                if (auto new_settings = select_with_union_query->list_of_selects->children.back()->as<ASTSelectQuery>()->settings())
                    InterpreterSetQuery(new_settings, context).executeForCurrentContext();
            }
        }
        else if (const auto * query_with_output = dynamic_cast<const ASTQueryWithOutput *>(ast.get()))
        {
            if (query_with_output->settings_ast)
                InterpreterSetQuery(query_with_output->settings_ast, context).executeForCurrentContext();
        }

        auto * insert_query = ast->as<ASTInsertQuery>();

        if (insert_query && insert_query->settings_ast)
            InterpreterSetQuery(insert_query->settings_ast, context).executeForCurrentContext();

        if (insert_query && insert_query->data)
        {
            query_end = insert_query->data;
            insert_query->has_tail = has_query_tail;
        }
        else
        {
            query_end = end;
        }
    }
    catch (...)
    {
        /// Anyway log the query.
        String query = String(begin, begin + std::min(end - begin, static_cast<ptrdiff_t>(max_query_size)));

        auto query_for_logging = prepareQueryForLogging(query, context);
        logQuery(query_for_logging, context, internal);

        if (!internal)
        {
            onExceptionBeforeStart(query_for_logging, context, time_in_microseconds(current_time), ast);
        }

        throw;
    }

	/// 下面的代码是解析AST树,生成一棵物理计划树,实际上是QueryPipeline的实例对象,它是可执行的流水线,是一种嵌套的结构。
	/// QueryPipeline可以认为是对Pipe实例的封装,而Pipe是对数据集上的一组transform操作,这些Pipe单元都必然有相同的数据header。
	...
  • 1
  • 2
  • 3
  • 4
  • 5
  • 6
  • 7
  • 8
  • 9
  • 10
  • 11
  • 12
  • 13
  • 14
  • 15
  • 16
  • 17
  • 18
  • 19
  • 20
  • 21
  • 22
  • 23
  • 24
  • 25
  • 26
  • 27
  • 28
  • 29
  • 30
  • 31
  • 32
  • 33
  • 34
  • 35
  • 36
  • 37
  • 38
  • 39
  • 40
  • 41
  • 42
  • 43
  • 44
  • 45
  • 46
  • 47
  • 48
  • 49
  • 50
  • 51
  • 52
  • 53
  • 54
  • 55
  • 56
  • 57
  • 58
  • 59
  • 60
  • 61
  • 62
  • 63
  • 64
  • 65
  • 66
  • 67
  • 68
  • 69
  • 70
  • 71
  • 72
  • 73
  • 74
  • 75
  • 76
  • 77
  • 78
  • 79
  • 80
  • 81
  • 82
  • 83
  • 84
  • 85
  • 86
  • 87
  • 88
  • 89
  • 90

parseQuery.cpp

此文件中定义了一系的全局的公共方法,上面讲到的executeQuery.cpp文件中调用的parseQuery(...)方法,就是在这个文件中定义,而parseQuery(...)方法实际上又是调用一开始创建的ParserQuery实例的方法完成工作的。

ParserQuery.cpp

继承关系:class ParserQuery : public IParserBase : public IParser

从前面展示的代码可以看到,执行Query语句的第一步是对SQL字符串的解析,生成AST树,而parse过程的入口就是此文件中定义的parseImpl(...)方法,代码如下:

bool ParserQuery::parseImpl(Pos & pos, ASTPtr & node, Expected & expected)
{
    ParserQueryWithOutput query_with_output_p;
    ParserInsertQuery insert_p(end);
    ParserUseQuery use_p;
    ParserSetQuery set_p;
    ParserSystemQuery system_p;
    ParserCreateUserQuery create_user_p;
    ParserCreateRoleQuery create_role_p;
    ParserCreateQuotaQuery create_quota_p;
    ParserCreateRowPolicyQuery create_row_policy_p;
    ParserCreateSettingsProfileQuery create_settings_profile_p;
    ParserDropAccessEntityQuery drop_access_entity_p;
    ParserGrantQuery grant_p;
    ParserSetRoleQuery set_role_p;
    ParserExternalDDLQuery external_ddl_p;

    bool res = query_with_output_p.parse(pos, node, expected)
        || insert_p.parse(pos, node, expected)
        || use_p.parse(pos, node, expected)
        || set_role_p.parse(pos, node, expected)
        || set_p.parse(pos, node, expected)
        || system_p.parse(pos, node, expected)
        || create_user_p.parse(pos, node, expected)
        || create_role_p.parse(pos, node, expected)
        || create_quota_p.parse(pos, node, expected)
        || create_row_policy_p.parse(pos, node, expected)
        || create_settings_profile_p.parse(pos, node, expected)
        || drop_access_entity_p.parse(pos, node, expected)
        || grant_p.parse(pos, node, expected)
        || external_ddl_p.parse(pos, node, expected);

    return res;
}
  • 1
  • 2
  • 3
  • 4
  • 5
  • 6
  • 7
  • 8
  • 9
  • 10
  • 11
  • 12
  • 13
  • 14
  • 15
  • 16
  • 17
  • 18
  • 19
  • 20
  • 21
  • 22
  • 23
  • 24
  • 25
  • 26
  • 27
  • 28
  • 29
  • 30
  • 31
  • 32
  • 33
  • 34

从上面的代码可以看到,ClickHouse目前支持所有的Query句型,包括DML、DDL、DQL,而ParserQuery对象,负责逐个尝试解析,一旦遇到能够解析完成的句型,就返回成功,这种实现方式自然会有一定的性能损耗。

这里我们是以SELECT句型分析的,因此这里会在执行完ParserQueryWithOutput的解析后,返回成功。

ParserQueryWithOutput.cpp

ParserInsertQuery类是继承自IParserBase类的,因此调用ParserQueryWithOutput::parse(...)方法,最终会调用parseImpl(...)方法完成工作代码如下:

bool ParserQueryWithOutput::parseImpl(Pos & pos, ASTPtr & node, Expected & expected)
{
    ParserShowTablesQuery show_tables_p;
    ParserSelectWithUnionQuery select_p;
    ParserTablePropertiesQuery table_p;
    ParserDescribeTableQuery describe_table_p;
    ParserShowProcesslistQuery show_processlist_p;
    ParserCreateQuery create_p;
    ParserAlterQuery alter_p;
    ParserRenameQuery rename_p;
    ParserDropQuery drop_p;
    ParserCheckQuery check_p;
    ParserOptimizeQuery optimize_p;
    ParserKillQueryQuery kill_query_p;
    ParserWatchQuery watch_p;
    ParserShowAccessQuery show_access_p;
    ParserShowAccessEntitiesQuery show_access_entities_p;
    ParserShowCreateAccessEntityQuery show_create_access_entity_p;
    ParserShowGrantsQuery show_grants_p;
    ParserShowPrivilegesQuery show_privileges_p;
    ParserExplainQuery explain_p;

    ASTPtr query;

    bool parsed =
           explain_p.parse(pos, query, expected)
        || select_p.parse(pos, query, expected)
        || show_create_access_entity_p.parse(pos, query, expected) /// should be before `show_tables_p`
        || show_tables_p.parse(pos, query, expected)
        || table_p.parse(pos, query, expected)
        || describe_table_p.parse(pos, query, expected)
        || show_processlist_p.parse(pos, query, expected)
        || create_p.parse(pos, query, expected)
        || alter_p.parse(pos, query, expected)
        || rename_p.parse(pos, query, expected)
        || drop_p.parse(pos, query, expected)
        || check_p.parse(pos, query, expected)
        || kill_query_p.parse(pos, query, expected)
        || optimize_p.parse(pos, query, expected)
        || watch_p.parse(pos, query, expected)
        || show_access_p.parse(pos, query, expected)
        || show_access_entities_p.parse(pos, query, expected)
        || show_grants_p.parse(pos, query, expected)
        || show_privileges_p.parse(pos, query, expected);

    if (!parsed)
        return false;
    ...
    /// 其它的收尾工作
}
  • 1
  • 2
  • 3
  • 4
  • 5
  • 6
  • 7
  • 8
  • 9
  • 10
  • 11
  • 12
  • 13
  • 14
  • 15
  • 16
  • 17
  • 18
  • 19
  • 20
  • 21
  • 22
  • 23
  • 24
  • 25
  • 26
  • 27
  • 28
  • 29
  • 30
  • 31
  • 32
  • 33
  • 34
  • 35
  • 36
  • 37
  • 38
  • 39
  • 40
  • 41
  • 42
  • 43
  • 44
  • 45
  • 46
  • 47
  • 48
  • 49
  • 50

从上面的代码可以看到,一条Query句型,又被细分为不同的语句,例如show、explain、select等,因此这里继续跟踪ParserSelectWithUnionQuery类分析。

ParserSelectWithUnionQuery.cpp

一条SELECT语句,又有两中不同的表示形式,即单句型和多句型,即存在UNION ALL关键字时,SELECT语句是多句型的,否则是单句型的。
UNION ALL的存在,表示这条件SQL语句可以解析为多条可以单独执行的QUERY语句,因此这里以ParserList对象保存可能存在的、并行语句,代码如下:

bool ParserSelectWithUnionQuery::parseImpl(Pos & pos, ASTPtr & node, Expected & expected)
{
    ASTPtr list_node;

    ParserList parser(std::make_unique<ParserUnionQueryElement>(), std::make_unique<ParserKeyword>("UNION ALL"), false);
    if (!parser.parse(pos, list_node, expected))
        return false;

    auto select_with_union_query = std::make_shared<ASTSelectWithUnionQuery>();

    node = select_with_union_query;
    select_with_union_query->list_of_selects = std::make_shared<ASTExpressionList>();
    select_with_union_query->children.push_back(select_with_union_query->list_of_selects);

    // flatten inner union query
    for (auto & child : list_node->children)
        getSelectsFromUnionListNode(child, select_with_union_query->list_of_selects->children);

    return true;
}
  • 1
  • 2
  • 3
  • 4
  • 5
  • 6
  • 7
  • 8
  • 9
  • 10
  • 11
  • 12
  • 13
  • 14
  • 15
  • 16
  • 17
  • 18
  • 19
  • 20

从上面可以看到,不论有没有UNION ALL关键字存在,一条SELECT语句的完整解析过程,又是交由ParserUnionQueryElement对象处理的。

ParserUnionQueryElement.cpp

这个类的解析方法,仅仅是创建一个新的ParserSelectQuery对象,然后返回它parse后的结果。

bool ParserUnionQueryElement::parseImpl(Pos & pos, ASTPtr & node, Expected & expected)
{
	/// ParserSubquery 尝试解析子句型,即由(和)包含的子句
	/// ParserSelectQuery 尝试解析SELECT语句
    if (!ParserSubquery().parse(pos, node, expected) && !ParserSelectQuery().parse(pos, node, expected))
        return false;

    if (const auto * ast_subquery = node->as<ASTSubquery>())
        node = ast_subquery->children.at(0);

    return true;
}
  • 1
  • 2
  • 3
  • 4
  • 5
  • 6
  • 7
  • 8
  • 9
  • 10
  • 11
  • 12

ParserSelectQuery.cpp

终于到了一个具体的SELECT语句的解析过程,它的方法定义如下:

bool ParserSelectQuery::parseImpl(Pos & pos, ASTPtr & node, Expected & expected)
{
    auto select_query = std::make_shared<ASTSelectQuery>();
    node = select_query;

    ParserKeyword s_select("SELECT");
    ParserKeyword s_distinct("DISTINCT");
    ParserKeyword s_from("FROM");
    ParserKeyword s_prewhere("PREWHERE");
    ParserKeyword s_where("WHERE");
    ParserKeyword s_group_by("GROUP BY");
    ParserKeyword s_with("WITH");
    ParserKeyword s_totals("TOTALS");
    ParserKeyword s_having("HAVING");
    ParserKeyword s_order_by("ORDER BY");
    ParserKeyword s_limit("LIMIT");
    ParserKeyword s_settings("SETTINGS");
    ParserKeyword s_by("BY");
    ParserKeyword s_rollup("ROLLUP");
    ParserKeyword s_cube("CUBE");
    ParserKeyword s_top("TOP");
    ParserKeyword s_with_ties("WITH TIES");
    ParserKeyword s_offset("OFFSET");
    ParserKeyword s_fetch("FETCH");
    ParserKeyword s_only("ONLY");
    ParserKeyword s_row("ROW");
    ParserKeyword s_rows("ROWS");
    ParserKeyword s_first("FIRST");
    ParserKeyword s_next("NEXT");

    ParserNotEmptyExpressionList exp_list(false);
    ParserNotEmptyExpressionList exp_list_for_with_clause(false);
    ParserNotEmptyExpressionList exp_list_for_select_clause(true);    /// Allows aliases without AS keyword.
    ParserExpressionWithOptionalAlias exp_elem(false);
    ParserOrderByExpressionList order_list;

    ParserToken open_bracket(TokenType::OpeningRoundBracket);
    ParserToken close_bracket(TokenType::ClosingRoundBracket);

    ASTPtr with_expression_list;
    ASTPtr select_expression_list;
    ASTPtr tables;
    ASTPtr prewhere_expression;
    ASTPtr where_expression;
    ASTPtr group_expression_list;
    ASTPtr having_expression;
    ASTPtr order_expression_list;
    ASTPtr limit_by_length;
    ASTPtr limit_by_offset;
    ASTPtr limit_by_expression_list;
    ASTPtr limit_offset;
    ASTPtr limit_length;
    ASTPtr top_length;
    ASTPtr settings;

    /// WITH expr list
    {
        if (s_with.ignore(pos, expected))
        {
            if (!ParserList(std::make_unique<ParserWithElement>(), std::make_unique<ParserToken>(TokenType::Comma))
                     .parse(pos, with_expression_list, expected))
                return false;
            if (with_expression_list->children.empty())
                return false;
        }
    }
    ...
  • 1
  • 2
  • 3
  • 4
  • 5
  • 6
  • 7
  • 8
  • 9
  • 10
  • 11
  • 12
  • 13
  • 14
  • 15
  • 16
  • 17
  • 18
  • 19
  • 20
  • 21
  • 22
  • 23
  • 24
  • 25
  • 26
  • 27
  • 28
  • 29
  • 30
  • 31
  • 32
  • 33
  • 34
  • 35
  • 36
  • 37
  • 38
  • 39
  • 40
  • 41
  • 42
  • 43
  • 44
  • 45
  • 46
  • 47
  • 48
  • 49
  • 50
  • 51
  • 52
  • 53
  • 54
  • 55
  • 56
  • 57
  • 58
  • 59
  • 60
  • 61
  • 62
  • 63
  • 64
  • 65
  • 66
  • 67

从上面的代码可以看到,ClickHouse基本上支持了常见的SELECT语法,并且也实现了一些自定义的关键字。

Select Query语句的Interpret过程

executeQuery.cpp

前面我们知道这个文件中定义的executeQueryImpl(...)方法,会产生将一条SQL字符串,解析为一棵AST树,那接下来就是生成计划树的过程,即interpret的过程,代码如下:

static std::tuple<ASTPtr, BlockIO> executeQueryImpl(
    const char * begin,
    const char * end,
    Context & context,
    bool internal,
    QueryProcessingStage::Enum stage,
    bool has_query_tail,
    ReadBuffer * istr)
{
	/// 解析SQL字符串,生成AST
	...
	try
    {
	    auto interpreter = InterpreterFactory::get(ast, context, stage);

        std::shared_ptr<const EnabledQuota> quota;
        if (!interpreter->ignoreQuota())
        {
            quota = context.getQuota();
            if (quota)
            {
                quota->used(Quota::QUERIES, 1);
                quota->checkExceeded(Quota::ERRORS);
            }
        }

        StreamLocalLimits limits;
        if (!interpreter->ignoreLimits())
        {
            limits.mode = LimitsMode::LIMITS_CURRENT;
            limits.size_limits = SizeLimits(settings.max_result_rows, settings.max_result_bytes, settings.result_overflow_mode);
        }
        // 调用解释器的执行方法,生成可以执行的Pipeline实例并执行。
        // res是BlockIO类型的变量
        res = interpreter->execute();
        QueryPipeline & pipeline = res.pipeline;
        bool use_processors = pipeline.initialized();

        if (const auto * insert_interpreter = typeid_cast<const InterpreterInsertQuery *>(&*interpreter))
        {
            /// Save insertion table (not table function). TODO: support remote() table function.
            auto table_id = insert_interpreter->getDatabaseTable();
            if (!table_id.empty())
                context.setInsertionTable(std::move(table_id));
        }
        ...
    }
    ...
}
  • 1
  • 2
  • 3
  • 4
  • 5
  • 6
  • 7
  • 8
  • 9
  • 10
  • 11
  • 12
  • 13
  • 14
  • 15
  • 16
  • 17
  • 18
  • 19
  • 20
  • 21
  • 22
  • 23
  • 24
  • 25
  • 26
  • 27
  • 28
  • 29
  • 30
  • 31
  • 32
  • 33
  • 34
  • 35
  • 36
  • 37
  • 38
  • 39
  • 40
  • 41
  • 42
  • 43
  • 44
  • 45
  • 46
  • 47
  • 48
  • 49

从上面的代码可以看到,通过InterpreterFactory的工厂方法,根据解析生成的AST树的类型,创建对应的解释器,这里会创建一个InterpreterSelectQuery的对象,然后调用InterpreterSelectQuery::execute(..)方法。

InterpreterSelectQuery.cpp

InterpreterFactory::get(…)方法会返回一个InterpreterSelectQuery类的实例,同时这个类在创建时,就会对整个AST树进行遍历,完成树的检查、及基本的优化调整工作,例如语法异常、表达式错误、PREWHERE语句优化、JOIN优化等,更为具体的过程见其cpp文件中的构造方法。
完成InterpreterSelectQuery对象的创建后,这里就显示调用execute()方法,开始执行这棵树。实际这棵树是不能直接执行的,还需要两个过程,如下面代码:

BlockIO InterpreterSelectQuery::execute()
{
    BlockIO res;
    QueryPlan query_plan;
	// 产生生成一棵逻辑计划树
    buildQueryPlan(query_plan);
	// 生成一棵物理计划树,即流水线
    res.pipeline = std::move(*query_plan.buildQueryPipeline());
    return res;
}
  • 1
  • 2
  • 3
  • 4
  • 5
  • 6
  • 7
  • 8
  • 9
  • 10

buildQueryPlan(query_plan)方法,会根据解析和调整后的AST树,生成一棵逻辑树,即QueryPlan,实际上它是一棵QueryPlanStep树,它们的介绍见最后的相关类小节
buildQueryPlan(...)方法,内部通过executeImpl(...)方法,将AST树中的结点,根据不同的操作类型,自顶向下搜集结点上的信息,并创建一个个的QueryPlanStep对象,添加进QueryPlan中,关键代码如下:

void InterpreterSelectQuery::executeImpl(QueryPlan & query_plan, const BlockInputStreamPtr & prepared_input, std::optional<Pipe> prepared_pipe)
{
    /** Streams of data. When the query is executed in parallel, we have several data streams.
     *  If there is no GROUP BY, then perform all operations before ORDER BY and LIMIT in parallel, then
     *  if there is an ORDER BY, then glue the streams using ResizeProcessor, and then MergeSorting transforms,
     *  if not, then glue it using ResizeProcessor,
     *  then apply LIMIT.
     *  If there is GROUP BY, then we will perform all operations up to GROUP BY, inclusive, in parallel;
     *  a parallel GROUP BY will glue streams into one,
     *  then perform the remaining operations with one resulting stream.
     */

    /// Now we will compose block streams that perform the necessary actions.
    auto & query = getSelectQuery();
    const Settings & settings = context->getSettingsRef();
    auto & expressions = analysis_result;
    auto & subqueries_for_sets = query_analyzer->getSubqueriesForSets();
    bool intermediate_stage = false;
    bool to_aggregation_stage = false;
    bool from_aggregation_stage = false;

    if (options.only_analyze)
    {
        auto read_nothing = std::make_unique<ReadNothingStep>(source_header);
        query_plan.addStep(std::move(read_nothing));

        if (expressions.prewhere_info)
        {
            auto prewhere_step = std::make_unique<FilterStep>(
                    query_plan.getCurrentDataStream(),
                    expressions.prewhere_info->prewhere_actions,
                    expressions.prewhere_info->prewhere_column_name,
                    expressions.prewhere_info->remove_prewhere_column);

            prewhere_step->setStepDescription("PREWHERE");
            query_plan.addStep(std::move(prewhere_step));

            // To remove additional columns in dry run
            // For example, sample column which can be removed in this stage
            if (expressions.prewhere_info->remove_columns_actions)
            {
                auto remove_columns = std::make_unique<ExpressionStep>(
                        query_plan.getCurrentDataStream(),
                        expressions.prewhere_info->remove_columns_actions);

                remove_columns->setStepDescription("Remove unnecessary columns after PREWHERE");
                query_plan.addStep(std::move(remove_columns));
            }
        }
    }
    /// 其它Step的构建过程
    ...
}
  • 1
  • 2
  • 3
  • 4
  • 5
  • 6
  • 7
  • 8
  • 9
  • 10
  • 11
  • 12
  • 13
  • 14
  • 15
  • 16
  • 17
  • 18
  • 19
  • 20
  • 21
  • 22
  • 23
  • 24
  • 25
  • 26
  • 27
  • 28
  • 29
  • 30
  • 31
  • 32
  • 33
  • 34
  • 35
  • 36
  • 37
  • 38
  • 39
  • 40
  • 41
  • 42
  • 43
  • 44
  • 45
  • 46
  • 47
  • 48
  • 49
  • 50
  • 51
  • 52
  • 53

当完成整棵QueryPlan树的转换后,仅仅是生成了一个优化后的逻辑计划树,还需要将逻辑树转换成物理计划树,才能真正地开始执行,而这一步的工作是由QueryPlan::buildQueryPipeline()方法完成的。

QueryPlan.cpp

buildQueryPipeline()方法会将逻辑树中的一个个QueryPlanStep结点,自底向上,从左向右转换成IProcessor的实例对象,也就是物理计划树中的结点,将组织成QueryPipeline的结构。QueryPlan树的遍历过程如下:

// 逻辑计划树树的一层,Step关联结构,->表示左边先于右边执行,也表示左边的孩子是右边
// 一条不包含子句的逻辑树结构如下,一棵倒立的树,其中每一个step结点就是一层,所谓的流水线就是自顶向下的父子结构:
// prepared_source_step -> prewhere_step -> remove_columns ->
// row_level_security_step -> before_array_join_step ->
// array_join_step -> before_join_step -> join_step -> where_step ->
// aggregating_step -> partial_sorting -> merge_sorting_step ->
// merging_sorted -> merging_aggregated -> having_step ->
// expression_step -> distinct_step (root结点)
// 其中prepared_source_step表示待读入的数据源,它可能是一个子句,subquery,如果有子句,则先执行子句。
// 因此上面的流水线最终是如下的样子:
// subquery --complete--> prepared_source_step -> ...
//
// Pipeline的拼接则是按照逻辑树自底向上构建的,从root结点开始,最终上面的逻辑计划树最终就转换成了如下的结构:
// Pipeline = initializePipeline -> FilterTransform -> ExpressionTransform -> ... -> DistinctTransform
// 所以一个Pipeline的执行顺序为:从左到右。
QueryPipelinePtr QueryPlan::buildQueryPipeline()
{
    checkInitialized();
    optimize();
	// 一个Frame表示一个结点,及到这个结点已经生成的Pipeline对象
	// 这里会采用自底向上,从左到右的方式遍历逻辑计划树,也就意味着对于第N层的第I个结点,只有在遍
	// 完第N层的前N-1个结点后,才会遍历到当前结点,同时,由于一条件Query语句可能存在子句且并行,
	// 例如(select a union select b),因此这里使用数组来保存当前层可能的Pipeline实例,同时也作为当前层遍历的完成的检查条件。
    struct Frame
    {
        Node * node;
        QueryPipelines pipelines = {};
    };

    QueryPipelinePtr last_pipeline;

    std::stack<Frame> stack;
    stack.push(Frame{.node = root});

    while (!stack.empty())
    {
        auto & frame = stack.top();

        if (last_pipeline)
        {
        	// 如果一个Step结点和其孩子结点都遍历完成时,就将这个结点对应的Pipeline对象,
        	// 添加到当前层的Pipeline队列中,以便在一个流水线的上层算子,能够通过数组的长度,
        	// 来判断是不是已经处理完当前层的Step算子了。
            frame.pipelines.emplace_back(std::move(last_pipeline));
            last_pipeline = nullptr;
        }

        size_t next_child = frame.pipelines.size();
        if (next_child == frame.node->children.size())
        {
            bool limit_max_threads = frame.pipelines.empty();
            // 当前结点的所有的子结点都已经遍历完成了,也意味着当前结点的Pipelines构建完成,
            // 就将子结点生成的Pipelines绑定到当前Step结点上,这种绑定关系表示当前结点和其
            // 子结点会创建的所有IProcessor算子
            last_pipeline = frame.node->step->updatePipeline(std::move(frame.pipelines));
			// 从最后一个结点
            if (limit_max_threads && max_threads)
                last_pipeline->limitMaxThreads(max_threads);

            stack.pop();
        }
        else
        	/// 创建一个新的子结点的Pipelines结构
            stack.push(Frame{.node = frame.node->children[next_child]});
    }

    for (auto & context : interpreter_context)
        last_pipeline->addInterpreterContext(std::move(context));

    return last_pipeline;
}
  • 1
  • 2
  • 3
  • 4
  • 5
  • 6
  • 7
  • 8
  • 9
  • 10
  • 11
  • 12
  • 13
  • 14
  • 15
  • 16
  • 17
  • 18
  • 19
  • 20
  • 21
  • 22
  • 23
  • 24
  • 25
  • 26
  • 27
  • 28
  • 29
  • 30
  • 31
  • 32
  • 33
  • 34
  • 35
  • 36
  • 37
  • 38
  • 39
  • 40
  • 41
  • 42
  • 43
  • 44
  • 45
  • 46
  • 47
  • 48
  • 49
  • 50
  • 51
  • 52
  • 53
  • 54
  • 55
  • 56
  • 57
  • 58
  • 59
  • 60
  • 61
  • 62
  • 63
  • 64
  • 65
  • 66
  • 67
  • 68
  • 69
  • 70
  • 71

下面举例说明,如何从一个QueryPlanStep转换到对应的IProcessor实例,从上面的代码可以看到这个过程应该是在updatePipeline(...)方法中完成,例如这里有过滤条件dt='20210501,那么它就对应一个FilterStep的实例,它的updatePipeline方法定义如下:

QueryPipelinePtr ITransformingStep::updatePipeline(QueryPipelines pipelines)
{
    if (collect_processors)
    {
    	// 收集Pipelines中的第一个Pipeline对象
        QueryPipelineProcessorsCollector collector(*pipelines.front(), this);
        // 将当前的ITransformingStep的实例类对应的IProcessor实例,添加到第一个Pipeline对象中
        transformPipeline(*pipelines.front());
        // detachProcessors()方法会将Pipleline中已经存入的所有IProcessor实例更新
        // 的Step引用,更新为当前Step,表示
        // 同时将更新的IProcessor实例集合,赋值给当前Step实例的,方便在创建Pipeline时
        processors = collector.detachProcessors();
    }
    else
        transformPipeline(*pipelines.front());

    return std::move(pipelines.front());
}
  • 1
  • 2
  • 3
  • 4
  • 5
  • 6
  • 7
  • 8
  • 9
  • 10
  • 11
  • 12
  • 13
  • 14
  • 15
  • 16
  • 17
  • 18

下面举例一个过滤算子从逻辑结点到物理结点的构建过程,代码如下:

void FilterStep::transformPipeline(QueryPipeline & pipeline)
{
    auto expression = std::make_shared<ExpressionActions>(actions_dag);
    // 向输入的Pipeline对象中,添加一个过滤算子,即下面的lambda表达式返回的结果,
    // FilterTransform
    pipeline.addSimpleTransform([&](const Block & header, QueryPipeline::StreamType stream_type)
    {
        bool on_totals = stream_type == QueryPipeline::StreamType::Totals;
        return std::make_shared<FilterTransform>(header, expression, filter_column_name, remove_filter_column, on_totals);
    });
	// 如果输入的Pipeline对象所包含的输入流,与当前的算子的输出结果拥有不同的schema信息,
	// 则必然是调用了某些表达式,将原来的字段类型,转换成了另外一个类型,因此
	// 再向Pipeline对象中追加一个ExpressionTransform操作,用于将之前的字段的类型转换
	// 为新的输出类型。
    if (!blocksHaveEqualStructure(pipeline.getHeader(), output_stream->header))
    {
        auto convert_actions_dag = ActionsDAG::makeConvertingActions(
                pipeline.getHeader().getColumnsWithTypeAndName(),
                output_stream->header.getColumnsWithTypeAndName(),
                ActionsDAG::MatchColumnsMode::Name);
        auto convert_actions = std::make_shared<ExpressionActions>(convert_actions_dag);

        pipeline.addSimpleTransform([&](const Block & header)
        {
            return std::make_shared<ExpressionTransform>(header, convert_actions);
        });
    }
}
  • 1
  • 2
  • 3
  • 4
  • 5
  • 6
  • 7
  • 8
  • 9
  • 10
  • 11
  • 12
  • 13
  • 14
  • 15
  • 16
  • 17
  • 18
  • 19
  • 20
  • 21
  • 22
  • 23
  • 24
  • 25
  • 26
  • 27
  • 28

FilterStep更新Pipeline的过程比较简单,仅仅是创建相应的IProcessor实例对象,并添加到Pipeline中的默认分组中即可。

Query语句执行过程中的相关类

QueryPlan.h

可以看到QueryPlan是一棵树结果,它的每一个结点Node,实际上是对QueryPlanStepPtr的封装,而QueryPlanStepPtr是指向QueryPlanStep类型的对象的指针,类定义如下:

/// A tree of query steps.
/// The goal of QueryPlan is to build QueryPipeline.
/// QueryPlan let delay pipeline creation which is helpful for pipeline-level optimisations.
class QueryPlan
{
public:
    QueryPlan();
    ~QueryPlan();
    QueryPlan(QueryPlan &&);
    QueryPlan & operator=(QueryPlan &&);

    void unitePlans(QueryPlanStepPtr step, std::vector<QueryPlanPtr> plans);
    void addStep(QueryPlanStepPtr step);

    bool isInitialized() const { return root != nullptr; } /// Tree is not empty
    bool isCompleted() const; /// Tree is not empty and root hasOutputStream()
    const DataStream & getCurrentDataStream() const; /// Checks that (isInitialized() && !isCompleted())

    void optimize();

    QueryPipelinePtr buildQueryPipeline();

    /// If initialized, build pipeline and convert to pipe. Otherwise, return empty pipe.
    Pipe convertToPipe();

    void explainPlan(WriteBuffer & buffer, const ExplainPlanOptions & options);
    void explainPipeline(WriteBuffer & buffer, const ExplainPipelineOptions & options);

    /// Set upper limit for the recommend number of threads. Will be applied to the newly-created pipelines.
    /// TODO: make it in a better way.
    void setMaxThreads(size_t max_threads_) { max_threads = max_threads_; }
    size_t getMaxThreads() const { return max_threads; }

    void addInterpreterContext(std::shared_ptr<Context> context);

    /// Tree node. Step and it's children.
    struct Node
    {
        QueryPlanStepPtr step;
        std::vector<Node *> children = {};
    };

    using Nodes = std::list<Node>;

private:
    Nodes nodes;
    Node * root = nullptr;

    void checkInitialized() const;
    void checkNotCompleted() const;

    /// Those fields are passed to QueryPipeline.
    size_t max_threads = 0;
    std::vector<std::shared_ptr<Context>> interpreter_context;
};
  • 1
  • 2
  • 3
  • 4
  • 5
  • 6
  • 7
  • 8
  • 9
  • 10
  • 11
  • 12
  • 13
  • 14
  • 15
  • 16
  • 17
  • 18
  • 19
  • 20
  • 21
  • 22
  • 23
  • 24
  • 25
  • 26
  • 27
  • 28
  • 29
  • 30
  • 31
  • 32
  • 33
  • 34
  • 35
  • 36
  • 37
  • 38
  • 39
  • 40
  • 41
  • 42
  • 43
  • 44
  • 45
  • 46
  • 47
  • 48
  • 49
  • 50
  • 51
  • 52
  • 53
  • 54
  • 55

从它的定义可以看到,除了一些构成树的基本信息外,QueryPlan还包含了一个optimize()方法,它是对逻辑树进行优化的过程,后面再看它的实现吧。

QueryPipeline.h

Pipe.h

/// Pipe is a set of processors which represents the part of pipeline.
/// Pipe contains a list of output ports, with specified port for totals and specified port for extremes.
/// All output ports have same header.
/// All other ports are connected, all connections are inside processors set.
class Pipe
{
private:
    /// Destruction order: processors, header, locks, temporary storages, local contexts
    Holder holder;

    /// Header is common for all output below.
    Block header;
    Processors processors;

    /// Output ports. Totals and extremes are allowed to be empty.
    OutputPortRawPtrs output_ports;
    OutputPort * totals_port = nullptr;
    OutputPort * extremes_port = nullptr;

    /// It is the max number of processors which can be executed in parallel for each step.
    /// Usually, it's the same as the number of output ports.
    size_t max_parallel_streams = 0;

    /// If is set, all newly created processors will be added to this too.
    /// It is needed for debug. See QueryPipelineProcessorsCollector.
    Processors * collected_processors = nullptr;

    /// This methods are for QueryPipeline. It is allowed to complete graph only there.
    /// So, we may be sure that Pipe always has output port if not empty.
    bool isCompleted() const { return !empty() && output_ports.empty(); }
    static Pipe unitePipes(Pipes pipes, Processors * collected_processors);
    void setSinks(const Pipe::ProcessorGetterWithStreamKind & getter);
    void setOutputFormat(ProcessorPtr output);

    friend class QueryPipeline;
}

ITransformingStep.h

继承结构:class ITransformingStep : public IQueryPlanStep
此类表示这个结点有一个输入流和一个输出流。它的许多实现类都在*Step.h头文件中定义,如下列举了逻辑计划树中所有可能的结点类型:

.//Processors/QueryPlan/AggregatingStep.h
.//Processors/QueryPlan/AddingConstColumnStep.h
.//Processors/QueryPlan/ExpressionStep.h
.//Processors/QueryPlan/ReadNothingStep.h
.//Processors/QueryPlan/LimitByStep.h
.//Processors/QueryPlan/SettingQuotaAndLimitsStep.h
.//Processors/QueryPlan/ArrayJoinStep.h
.//Processors/QueryPlan/ReverseRowsStep.h
.//Processors/QueryPlan/OffsetStep.h
.//Processors/QueryPlan/AddingDelayedSourceStep.h
.//Processors/QueryPlan/DistinctStep.h
.//Processors/QueryPlan/CubeStep.h
.//Processors/QueryPlan/RollupStep.h
.//Processors/QueryPlan/LimitStep.h
.//Processors/QueryPlan/CreatingSetsStep.h
.//Processors/QueryPlan/TotalsHavingStep.h
.//Processors/QueryPlan/PartialSortingStep.h
.//Processors/QueryPlan/MaterializingStep.h
.//Processors/QueryPlan/FillingStep.h
.//Processors/QueryPlan/FilterStep.h
.//Processors/QueryPlan/UnionStep.h
.//Processors/QueryPlan/MergeSortingStep.h
.//Processors/QueryPlan/AddingMissedStep.h
.//Processors/QueryPlan/IQueryPlanStep.h
.//Processors/QueryPlan/ExtremesStep.h
.//Processors/QueryPlan/MergingSortedStep.h
.//Processors/QueryPlan/ISourceStep.h
.//Processors/QueryPlan/ITransformingStep.h
.//Processors/QueryPlan/MergingAggregatedStep.h
.//Processors/QueryPlan/FinishSortingStep.h
  •  

*Transform.h

物理计划树中的可能结点类型,基本上和Step结点是一一对应的:

.//Processors/IInflatingTransform.h
.//Processors/OffsetTransform.h
.//Processors/ISimpleTransform.h
.//Processors/IAccumulatingTransform.h
.//Processors/Merges/VersionedCollapsingTransform.h
.//Processors/Merges/AggregatingSortedTransform.h
.//Processors/Merges/SummingSortedTransform.h
.//Processors/Merges/MergingSortedTransform.h
.//Processors/Merges/CollapsingSortedTransform.h
.//Processors/Merges/IMergingTransform.h
.//Processors/Merges/ReplacingSortedTransform.h
.//Processors/Merges/GraphiteRollupSortedTransform.h
.//Processors/LimitTransform.h
.//Processors/Transforms/ArrayJoinTransform.h
.//Processors/Transforms/DistinctTransform.h
.//Processors/Transforms/FillingTransform.h
.//Processors/Transforms/MergeSortingTransform.h
.//Processors/Transforms/PartialSortingTransform.h
.//Processors/Transforms/ExtremesTransform.h
.//Processors/Transforms/JoiningTransform.h
.//Processors/Transforms/CopyTransform.h
.//Processors/Transforms/MaterializingTransform.h
.//Processors/Transforms/ReverseTransform.h
.//Processors/Transforms/AddingMissedTransform.h
.//Processors/Transforms/CubeTransform.h
.//Processors/Transforms/FinishSortingTransform.h
.//Processors/Transforms/LimitByTransform.h
.//Processors/Transforms/AggregatingTransform.h
.//Processors/Transforms/MergingAggregatedMemoryEfficientTransform.h
.//Processors/Transforms/LimitsCheckingTransform.h
.//Processors/Transforms/ExpressionTransform.h
.//Processors/Transforms/AggregatingInOrderTransform.h
.//Processors/Transforms/TotalsHavingTransform.h
.//Processors/Transforms/CreatingSetsTransform.h
.//Processors/Transforms/AddingConstColumnTransform.h
.//Processors/Transforms/RollupTransform.h
.//Processors/Transforms/MergingAggregatedTransform.h
.//Processors/Transforms/SortingTransform.h
.//Processors/Transforms/FilterTransform.h
.//Processors/Transforms/AddingSelectorTransform.h
.//DataStreams/SquashingTransform.h
  • 1
  • 2
  • 3
  • 4
  • 5
  • 6
  • 7
  • 8
  • 9
  • 10
  • 11
  • 12
  • 13
  • 14
  • 15
  • 16
  • 17
  • 18
  • 19
  • 20
  • 21
  • 22
  • 23
  • 24
  • 25
  • 26
  • 27
  • 28
  • 29
  • 30
  • 31
  • 32
  • 33
  • 34
  • 35
  • 36
  • 37
  • 38
  • 39
  • 40
  • 41

逻辑树QueryPlan的优化过程

实际上QueryPlan在创建过程虽然已经有做了一部分优化,但这里独立了一个方法专门用于更多的优化,但目前能够看到的仅仅是Limit的下推,实际上还有许多可以优化的过程,但ClickHouse并没有实现,因此可以说CH对于简单的QUERY语句能够有一个比较好的优化结果,但不善于就会复杂的Query语句

void QueryPlan::optimize()
{
    struct Frame
    {
        Node * node;
        size_t next_child = 0;
    };

    std::stack<Frame> stack;
    stack.push(Frame{.node = root});

    while (!stack.empty())
    {
        auto & frame = stack.top();

        if (frame.next_child == 0)
        {
            /// First entrance, try push down.
            if (frame.node->children.size() == 1)
                tryPushDownLimit(frame.node->step, frame.node->children.front());
        }

        if (frame.next_child < frame.node->children.size())
        {
            stack.push(Frame{frame.node->children[frame.next_child]});
            ++frame.next_child;
        }
        else
        {
            /// Last entrance, try lift up.
            if (frame.node->children.size() == 1)
                tryLiftUpArrayJoin(frame.node, frame.node->children.front(), nodes);

            stack.pop();
        }
    }
}

https://www.it610.com/article/1433037619675123712.htm

一. 背景

记录下第一次使用 GDB 调试 ClickHouse 源码的过程,这里仅仅是通过简单的调试过程了解 ClickHouse 内部的机制,有助于解决疑惑,代码小白,有错误见谅。

二. 调试问题

调试 ClickHouse 主要是为了解决个人遇到的一个实际问题,下面先描述下这个问题:

  1. 通过 clickhouse 自带的mysql表函数导入全量数据时(这里建了一张测试表memory_test50w行数据56G),因为超过最大的内存限制(CK服务器36G内存),导致了如下报错。
localhost :) insert into `test`.`memory_test`  select * mysql('192.168.1.1:3306','test','memory_test','root','xxxx');                                                  

Received exception from server (version 20.8.12):
Code: 241. DB::Exception: Received from 127.0.0.1:9000. DB::Exception: Memory limit (total) exceeded: would use 35.96 GiB (attempt to allocate chunk of 17181966336 bytes), maximum: 28.14 GiB: While executing SourceFromInputStream. 
  1. 大致过程就是 ClickHouse 会将 mysql 的数据读入内存然后批量写入,这里涉及到一个 buffer 的问题,ClickHouse 会读入多少行数据或者多少bytes的数据后再批量写入,根据show processlist观察来看,貌似达到100多w行数据就会写入一次,随后释放内存,再循环读写。那么我们的问题其实读取MySQL原表中100多万行的数据超过了我们 ClickHouse 内存配置大小。

技术分享 | ClickHouse GDB 调试笔记_第1张图片

  1. 关于这个问题,如果你CK服务器内存配置比较大其实是不会遇到的,我这里CK服务内存仅为32G,所以可能碰到这个内存问题,最简单的其实扩容下内存就行了,但是为了避免有些项目上不好进行内存扩容,所以需要想下其他方法解决。
    • 最开始想到的是用swap分区,但是实际测试下来,ClickHouse 只会用物理内存,不会用到虚拟内存。
    • 第二个方式是通过where条件+分页查询mysql,减小内存占用的峰值,实测有效,但是比较麻烦。
  2. 接着我想着是不是有什么参数可以控制这个批量写入的阀值,这样不就不会遇到内存不够的问题了嘛,100w会超过内存限制,50w应该就不会超过了把。但是我google了下并没有找到对应的参数,群里问了下也没人知道,没办法,只能去源码里找找看,这个值到底是不是写死的。

三. 打印栈帧

首先我们要通过 pstack 打印下堆栈信息,不然无法知道函数入口在哪,在这之前需要我们额外安装下对应 ClickHouse 版本的clickhouse-common-static-dbg的 rpm 包(调试库),不然堆栈信息会比较简陋,而且后面GDB调试也会有问题。

技术分享 | ClickHouse GDB 调试笔记_第2张图片

比如我的 ClickHouse 版本为 20.8.12.2 ,那么对应的rpm包就为clickhouse-common-static-dbg-20.8.12.2-2.x86_64.rpm

再 ClickHouse 中执行 insert 语句后,通过 pstack + clickhouse进程pid > /opt/ck_pstack.log 导入到一个日志文件中。

技术分享 | ClickHouse GDB 调试笔记_第3张图片

四. GDB调试

GDB 不多介绍,不过个人更喜欢使用CGDB,使用 Yum 安装即可,我使用的 OS 版本是 CentOS7.9 。

使用 GDB 调试前,还需要将对应 ClickHouse 的源码下载后解压到/build/目录下(默认的编译目录)。

技术分享 | ClickHouse GDB 调试笔记_第4张图片

然后调试步骤大概是:

  1. 首先新建个窗口,clickhouse-client 连接进入 ClickHouse ,等待执行 SQL 。
  2. 打开 CGDB ,attach 到 Clickhouse 的 pid 上,在对应函数行打上断点,这里选择的是DB::SourceFromInputStream::generate(从栈帧中选择),CGDB 中需要配置忽略信号量,不然 CGDB 会一直断开。
(gdb) att 1446
(gdb) handle SIGUSR2 noprint nostop
Signal        Stop      Print   Pass to program Description
SIGUSR2       No        No      Yes             User defined signal 2
(gdb) handle SIGUSR1 noprint nostop
Signal        Stop      Print   Pass to program Description
SIGUSR1       No        No      Yes             User defined signal 1
(gdb) b DB::SourceFromInputStream::generate
Breakpoint 1 at 0x16610f40: file ../src/Processors/Sources/SourceFromInputStream.cpp, line 135.
  1. 在第一步骤打开的窗口中执行 insert 语句。
  2. CGDB 中按 c 继续,就会跳到 generate 函数上

技术分享 | ClickHouse GDB 调试笔记_第5张图片

  1. 接着就是慢慢n,打印参数,一步一步看代码流程。

五. max_block_size

这里直接上调试发现的结果,当读取的行数等于 max_block_size 的时候,就会跳出循环读取,批量写入 ClickHouse ,释放内存,这个 max_block_size 的 GDB 打印的值为1048545,看着非常像是一个可以配置的参数。

技术分享 | ClickHouse GDB 调试笔记_第6张图片

技术分享 | ClickHouse GDB 调试笔记_第7张图片

搜索源码中 max_block_size 的赋值,下面这段看着比较像,由min_insert_block_size_rows配置参数决定。

技术分享 | ClickHouse GDB 调试笔记_第8张图片

接着从 system.settings 表中搜索了下,发现 min_insert_block_size_rows 这个参数的描述和默认值确实都非常像,基本确定这个参数就会影响批量写入的行数。

技术分享 | ClickHouse GDB 调试笔记_第9张图片

六. 测试

在会话中修改参数为1w,然后执行 insert ,可以跑通,而且不会报错。

localhost :) set min_insert_block_size_rows = 10000;

0 rows in set. Elapsed: 0.001 sec. 

localhost :) insert into `test`.`memory_test`  select * from mysql('192.168.213.222:3306','test','memory_test','root','xxxx');                                                  

INSERT INTO test.memory_test SELECT 
    *
FROM mysql('192.168.213.222:3306', 'test', 'memory_test', 'root', 'xxxx')
Ok.

0 rows in set. Elapsed: 2065.189 sec. Processed 500.00 thousand rows, 51.23 GB (242.11 rows/s., 24.81 MB/s.) 

show processlist 也可以看到确实是1w行就写入,那么就不会再产生内存不足的问题,至此这个问题基本解决。

技术分享 | ClickHouse GDB 调试笔记_第10张图片


由于工作的需求,后续笔者工作需要和开源的OLAP数据库ClickHouse打交道。ClickHouse是Yandex在2016年6月15日开源了一个分析型数据库,以强悍的单机处理能力被称道
笔者在实际测试ClickHouse和阅读ClickHouse的源码过程之中,对”战斗民族”开发的数据库十分欣赏。ClickHouse不仅是一个很好的数据库学习材料,而且同时应用了大量的CPP17的新特性进行开发,也是一个大型的Modern CPP的教导资料。
笔者接下来会陆续将阅读ClickHouse的部分心得体会与通过源码阅读笔记的方式和大家分享,坦白说,这种源码阅读笔记很难写啊。(多一分繁琐,少一分就模糊了~~)
第一篇文章,我们就从聚合函数的实现开始聊起~~ 上车!

1.基础知识的梳理

什么是聚合函数?

聚合函数: 顾名思义就是对一组数据执行聚合计算并返回结果的函数。
这类函数在数据库之中很常见,如:count, max, min, sum等等。

ClickHouse的实现接口
  • IAggregateFunction接口
    在ClickHouse之中,定义了一个统一的聚合函数接口:IAggregateFunction.(在ClickHouse之中,所有的接口类都是以大写的I开头的。) 上文笔者提到的聚合函数,则都是作为抽象类IAggregateFunction的子类实现的。其中该接口最为核心的方法是下面这5个方法:
    • add函数:最为核心的调用接口,将对应AggregateDataPtr指针之中数据取出,与列columns中的第row_num的数据进行对应的聚合计算。(这里可以看到ClickHouse是一个纯粹的列式存储数据库,所有的操作都是基于列的数据结构。)
    • merge函数:将两个聚合结果进行合并的函数,通常用在并发执行聚合函数的过程之中,需要将对应的聚合结果进行合并。
    • serialize函数与deserialize函数:序列化与反序列化的函数,通常用于spill to disk或分布式场景需要保存或传输中间结果的。
    • addBatch函数:这是函数也是非常重要的,虽然它仅仅实现了一个for循环调用add函数。它通过这样的方式来减少虚函数的调用次数,并且增加了编译器内联的概率。(虚函数的调用需要一次访存指令,一次查表,最终才能定位到需要调用的函数上,这在传统的火山模型的实现上会带来极大的CPU开销。
  /** Adds a value into aggregation data on which place points to.
     *  columns points to columns containing arguments of aggregation function.
     *  row_num is number of row which should be added.
     *  Additional parameter arena should be used instead of standard memory allocator if the addition requires memory allocation.
     */
    virtual void add(AggregateDataPtr place, const IColumn ** columns, size_t row_num, Arena * arena) const = 0;

    /// Merges state (on which place points to) with other state of current aggregation function.
    virtual void merge(AggregateDataPtr place, ConstAggregateDataPtr rhs, Arena * arena) const = 0;

    /// Serializes state (to transmit it over the network, for example).
    virtual void serialize(ConstAggregateDataPtr place, WriteBuffer & buf) const = 0;

    /// Deserializes state. This function is called only for empty (just created) states.
    virtual void deserialize(AggregateDataPtr place, ReadBuffer & buf, Arena * arena) const = 0;
    // /** Contains a loop with calls to "add" function. You can collect arguments into array "places"
      *  and do a single call to "addBatch" for devirtualization and inlining.
      */
    virtual void addBatch(size_t batch_size, AggregateDataPtr * places, size_t place_offset, const IColumn ** columns, Arena * arena) const = 0;

  • 抽象类IColumn
    上面的接口IAggregateFunction的函数使用到了ClickHouse的核心接口IColumn类,这里也进行简要的介绍。 IColumn 接口表达了所有数据在ClickHouse之中的用内存表达的数据结构,其他带有具体数据类型的如ColumnUInt8、ColumnArray 等, 都实现了对应的列接口,并且在子类之中具象实现了不同的内存布局。
    IColumn的子类实现细节很琐碎,笔者这里就暂时不展开讲了,笔者这里就简单讲讲涉及到聚合函数调用部分的IColumn接口的对应方法:
    这里columns是一个二维数组,通过columns[0]可以取到第一列。(这里只有涉及到一列,为什么columns是二维数组呢?因为处理array等列的时候,也是通过对应的接口,而array就需要应用二维数组了. )
    注意这里有一个强制的类型转换,column已经转换为ColVecType类型了,这是模板派生出IColumn的子类。
    然后通过IColumn子类实现的getData方法获取对应row_num行的数据进行add函数调用就完成了一次聚合函数的计算了。
    void add(AggregateDataPtr place, const IColumn ** columns, size_t row_num, Arena *) const override
    {
        const auto & column = static_cast<const ColVecType &>(*columns[0]);
        this->data(place).add(column.getData()[row_num]);
    }
  • IAggregateFunctionHelper接口
    这个接口是上面提到 IAggregateFunction的辅助子类接口,它很巧妙的通过模板的类型派生,将虚函数的调用转换为函数指针的调用,这个在实际聚合函数的实现过程之中能够大大提高计算的效率。
    函数addFree就实现了我上述所说的过程,但是它是一个private的函数,所以通常我们都是通过getAddressOfAddFunction获取对应的函数地址。这在聚合查询的过程之中能够提高20%左右的执行效率。
template <typename Derived>
class IAggregateFunctionHelper : public IAggregateFunction
{
private:
    static void addFree(const IAggregateFunction * that, AggregateDataPtr place, const IColumn ** columns, size_t row_num, Arena * arena)
    {
        static_cast<const Derived &>(*that).add(place, columns, row_num, arena);
    }

public:
    IAggregateFunctionHelper(const DataTypes & argument_types_, const Array & parameters_)
        : IAggregateFunction(argument_types_, parameters_) {}

    AddFunc getAddressOfAddFunction() const override { return &addFree; }
  • AggregateFunctionFactory类
    顾名思义,这个是一个生成聚合函数的工厂类。它的逻辑很简单,所有ClickHouse之中所相关的聚合函数都是通过这个工厂类注册并且获取,然后进行调用的。
class AggregateFunctionFactory final : private boost::noncopyable, public IFactoryWithAliases<AggregateFunctionCreator>
{
public:

    static AggregateFunctionFactory & instance();

    /// Register a function by its name.
    /// No locking, you must register all functions before usage of get.
    void registerFunction(
        const String & name,
        Creator creator,
        CaseSensitiveness case_sensitiveness = CaseSensitive);

    /// Throws an exception if not found.
    AggregateFunctionPtr get(
        const String & name,
        const DataTypes & argument_types,
        const Array & parameters = {},
        int recursion_level = 0) const;

2.聚合函数的注册流程

有了上述的背景知识,我们接下来举个栗子。来看看一个聚合函数的实现细节,以及它是如何被使用的。

AggregateFunctionSum

笔者这里选取了一个很简单的聚合算子Sum,我们来看看它实现的代码细节。
这里我们可以看到AggregateFunctionSum是个final类,无法被继承了。而它继承了上面提到的IAggregateFunctionHelp类的子类IAggregateFunctionDataHelper类。

这里我们就重点看,这个类override了getName方法,返回了对应的名字sum。并且实现了我们上文提到的四个核心的方法。

  • add
  • merge
  • seriable
  • deserialize
template <typename T, typename TResult, typename Data>
class AggregateFunctionSum final : public IAggregateFunctionDataHelper<Data, AggregateFunctionSum<T, TResult, Data>>
{
public:
    using ResultDataType = std::conditional_t<IsDecimalNumber<T>, DataTypeDecimal<TResult>, DataTypeNumber<TResult>>;
    using ColVecType = std::conditional_t<IsDecimalNumber<T>, ColumnDecimal<T>, ColumnVector<T>>;
    using ColVecResult = std::conditional_t<IsDecimalNumber<T>, ColumnDecimal<TResult>, ColumnVector<TResult>>;

    String getName() const override { return "sum"; }

    AggregateFunctionSum(const DataTypes & argument_types_)
        : IAggregateFunctionDataHelper<Data, AggregateFunctionSum<T, TResult, Data>>(argument_types_, {})
        , scale(0)
    {}

    AggregateFunctionSum(const IDataType & data_type, const DataTypes & argument_types_)
        : IAggregateFunctionDataHelper<Data, AggregateFunctionSum<T, TResult, Data>>(argument_types_, {})
        , scale(getDecimalScale(data_type))
    {}

    DataTypePtr getReturnType() const override
    {
        if constexpr (IsDecimalNumber<T>)
            return std::make_shared<ResultDataType>(ResultDataType::maxPrecision(), scale);
        else
            return std::make_shared<ResultDataType>();
    }

    void add(AggregateDataPtr place, const IColumn ** columns, size_t row_num, Arena *) const override
    {
        const auto & column = static_cast<const ColVecType &>(*columns[0]);
        this->data(place).add(column.getData()[row_num]);
    }

    void merge(AggregateDataPtr place, ConstAggregateDataPtr rhs, Arena *) const override
    {
        this->data(place).merge(this->data(rhs));
    }

    void serialize(ConstAggregateDataPtr place, WriteBuffer & buf) const override
    {
        this->data(place).write(buf);
    }

    void deserialize(AggregateDataPtr place, ReadBuffer & buf, Arena *) const override
    {
        this->data(place).read(buf);
    }

    void insertResultInto(ConstAggregateDataPtr place, IColumn & to) const override
    {
        auto & column = static_cast<ColVecResult &>(to);
        column.getData().push_back(this->data(place).get());
    }

private:
    UInt32 scale;
};

接下来,ClickHouse实现了两种聚合计算:AggregateFunctionSumDataAggregateFunctionSumKahanData。后者是用Kahan算法避免float类型精度损失的,我们可以暂时不细看。直接看SumData的实现。这是个模板类,之前我们讲到AggregateFunction的函数就是通过AggregateDataPtr指针来获取AggregateFunctionSumData的地址,来调用add实现聚合算子的。我们可以看到AggregateFunctionSumData实现了前文提到的add, merge, write,read四大方法,正好和接口一一对应上了。

template <typename T>
struct AggregateFunctionSumData
{
    T sum{};

    void add(T value)
    {
        sum += value;
    }

    void merge(const AggregateFunctionSumData & rhs)
    {
        sum += rhs.sum;
    }

    void write(WriteBuffer & buf) const
    {
        writeBinary(sum, buf);
    }

    void read(ReadBuffer & buf)
    {
        readBinary(sum, buf);
    }

    T get() const
    {
        return sum;
    }
};

ClickHouse在Server启动时。main函数之中会调用registerAggregateFunction的初始化函数注册所有的聚合函数。
然后调用到下面的函数:

void registerAggregateFunctionSum(AggregateFunctionFactory & factory)
{
    factory.registerFunction("sum", createAggregateFunctionSum<AggregateFunctionSumSimple>, AggregateFunctionFactory::CaseInsensitive);
    factory.registerFunction("sumWithOverflow", createAggregateFunctionSum<AggregateFunctionSumWithOverflow>);
    factory.registerFunction("sumKahan", createAggregateFunctionSum<AggregateFunctionSumKahan>);
}

这里又调用了factory.registerFunction("sum", createAggregateFunctionSum<AggregateFunctionSumSimple>, AggregateFunctionFactory::CaseInsensitive);来进行上述我们看到的聚合函数的注册。这里有一点很恶心的模板代码,笔者这里简化了一下,把注册的部分函数拉出来:

createAggregateFunctionSum(const std::string & name, const DataTypes & argument_types, const Array & parameters)
{
    AggregateFunctionPtr res;
    DataTypePtr data_type = argument_types[0];
    if (isDecimal(data_type))
        res.reset(createWithDecimalType<Function>(*data_type, *data_type, argument_types));
    else
        res.reset(createWithNumericType<Function>(*data_type, argument_types));
    return res;

这里的Function模板就是上面的AggregateFunctionSumSimple, 而它又是下面的模板类型:

template <typename T> using AggregateFunctionSumSimple = typename SumSimple<T>::Function;

template <typename T>
struct SumSimple
{
    /// @note It uses slow Decimal128 (cause we need such a variant). sumWithOverflow is faster for Decimal32/64
    using ResultType = std::conditional_t<IsDecimalNumber<T>, Decimal128, NearestFieldType<T>>;
    using AggregateDataType = AggregateFunctionSumData<ResultType>;
    using Function = AggregateFunctionSum<T, ResultType, AggregateDataType>;
};

不知道读者被绕晕了没,最终绕回来还是new出来这个AggregateFunctionSum<T, ResultType, AggregateDataType>
也就是完成了这个求和算子的注册,后续我们get出来就可以愉快的调用啦。(这里这部分的模板变化比较复杂,如果看不明白可以回到源码梳理一下~~~)

3. 小结

好了,关于聚合函数的基础信息,和它是如何实现并且通过工厂方法注册获取的流程算是搞明白了。
关于其他的聚合算子,也是大同小异的方式。笔者就不再赘述了,感兴趣的可以回到源码之中继续一探究竟。讲完了聚合函数的实现,下一篇笔者就要继续给探究聚合函数究竟在ClickHouse之中是如何和列存结合使用,并实现向量化的~~。
笔者是一个ClickHouse的初学者,对ClickHouse有兴趣的同学,也欢迎和笔者多多指教,交流。

Distributed之表查询流程

Distributed表引擎不会真实存储数据,是ClickHouse提供的一个分布式查询引擎,其查询原理大致概括起来就是将server端接收到的查询请求进行重写,并发送到指定的多个server端去执行查询,最终由接到请求的server端进行汇总,最后返回给client端。这个过程可以通过源码来更清晰的了解以下。

首先,从BlockInputStreams StorageDistributed::read方法说起,因为从InterpreterSelectQuery*这类的查询都会调用BlockInputStreams 类型的read方法

BlockInputStreams StorageDistributed::read(
    const Names & /*column_names*/,
    const SelectQueryInfo & query_info,
    const Context & context,
    QueryProcessingStage::Enum processed_stage,
    const size_t /*max_block_size*/,
    const unsigned /*num_streams*/)
{
    auto cluster = getCluster();

    // 获取settings,比如内存最大使用量之类的配置
    const Settings & settings = context.getSettingsRef();

    // 这里就是上面提到过的重写
    const auto & modified_query_ast = rewriteSelectQuery(
        query_info.query, remote_database, remote_table, remote_table_function_ptr);

    // 初始化一个不包含数据的Block
    Block header =
        InterpreterSelectQuery(query_info.query, context, SelectQueryOptions(processed_stage)).getSampleBlock();

    // 根据是使用表函数还是直接使用库表的不同进入不同的逻辑
    ClusterProxy::SelectStreamFactory select_stream_factory = remote_table_function_ptr
        ? ClusterProxy::SelectStreamFactory(
            header, processed_stage, remote_table_function_ptr, context.getExternalTables())
        : ClusterProxy::SelectStreamFactory(
            header, processed_stage, QualifiedTableName{remote_database, remote_table}, context.getExternalTables());

    // 是否自动跳过未使用的shard,如果配置了sharding_key,可以减小查询要搜索的shard范围
    if (settings.optimize_skip_unused_shards)
    {
        if (has_sharding_key)
        {
            auto smaller_cluster = skipUnusedShards(cluster, query_info);

            if (smaller_cluster)
            {
                cluster = smaller_cluster;
                LOG_DEBUG(log, "Reading from " << database_name << "." << table_name << ": "
                               "Skipping irrelevant shards - the query will be sent to the following shards of the cluster (shard numbers): "
                               " " << makeFormattedListOfShards(cluster));
            }
            else
            {
                LOG_DEBUG(log, "Reading from " << database_name << "." << table_name << ": "
                               "Unable to figure out irrelevant shards from WHERE/PREWHERE clauses - the query will be sent to all shards of the cluster");
            }
        }
    }

    // 根据重写的ast执行查询
    return ClusterProxy::executeQuery(
        select_stream_factory, cluster, modified_query_ast, context, settings);
}

read方法主要是sql重写及根据表函数及库表的不同逻辑初始化SelectStreamFactoryexecuteQuery方法是查询的入口

BlockInputStreams executeQuery(
    IStreamFactory & stream_factory, const ClusterPtr & cluster,
    const ASTPtr & query_ast, const Context & context, const Settings & settings)
{
    BlockInputStreams res;

    // 将重写的ast转为字符串,为了发送给其他server
    const std::string query = queryToString(query_ast);

    // 移除一些上下文的user限制,比如本次触发查询的user在其他server上,对于其他server而言
    // 是个新的user,不会累积统计一些限制
    Context new_context = removeUserRestrictionsFromSettings(context, settings);

    // user限流设置
    ThrottlerPtr user_level_throttler;
    if (auto process_list_element = context.getProcessListElement())
        user_level_throttler = process_list_element->getUserNetworkThrottler();

    // 如果没有配置限制,那么会使用最大带宽
    ThrottlerPtr throttler;
    if (settings.max_network_bandwidth || settings.max_network_bytes)
    {
        throttler = std::make_shared(
                settings.max_network_bandwidth,
                settings.max_network_bytes,
                "Limit for bytes to send or receive over network exceeded.",
                user_level_throttler);
    }
    else
        throttler = user_level_throttler;

    // 为cluster的每个shard上创建stream_factory,并执行查询
    for (const auto & shard_info : cluster->getShardsInfo())
        stream_factory.createForShard(shard_info, query, query_ast, new_context, throttler, res);

    return res;
}

executeQuery方法主要是修改和设置一些配置,接下来是stream_factory的创建了,createForShard是个虚函数,具体实现如下

void SelectStreamFactory::createForShard(
    const Cluster::ShardInfo & shard_info,
    const String & query, const ASTPtr & query_ast,
    const Context & context, const ThrottlerPtr & throttler,
    BlockInputStreams & res)
{
    // 构造一个本地流方法
    auto emplace_local_stream = [&]()
    {
        res.emplace_back(createLocalStream(query_ast, context, processed_stage));
    };

    // 构造一个远程流方法
    auto emplace_remote_stream = [&]()
    {
        auto stream = std::make_shared(shard_info.pool, query, header, context, nullptr, throttler, external_tables, processed_stage);
        stream->setPoolMode(PoolMode::GET_MANY);
        if (!table_func_ptr)
            stream->setMainTable(main_table);
        res.emplace_back(std::move(stream));
    };

    // 获取settings配置
    const auto & settings = context.getSettingsRef();

    // prefer_localhost_replica默认为true,如果shard_info还本地分片,进入以下逻辑
    if (settings.prefer_localhost_replica && shard_info.isLocal())
    {
        StoragePtr main_table_storage;

        // 根据是不是表函数方式使用不同逻辑获取main_table_storage,即一个IStorage
        if (table_func_ptr)
        {
            const auto * table_function = table_func_ptr->as();
            TableFunctionPtr table_function_ptr = TableFunctionFactory::instance().get(table_function->name, context);
            main_table_storage = table_function_ptr->execute(table_func_ptr, context, table_function_ptr->getName());
        }
        else
            main_table_storage = context.tryGetTable(main_table.database, main_table.table);


        // 如果main_table_storage不存在,就尝试去其他server获取
        if (!main_table_storage)
        {
            ProfileEvents::increment(ProfileEvents::DistributedConnectionMissingTable);
            if (shard_info.hasRemoteConnections())
            {
                LOG_WARNING(
                        &Logger::get("ClusterProxy::SelectStreamFactory"),
                        "There is no table " << main_table.database << "." << main_table.table
                        << " on local replica of shard " << shard_info.shard_num << ", will try remote replicas.");
                emplace_remote_stream();
            }
            else
                emplace_local_stream(); 

            return;
        }

        const auto * replicated_storage = dynamic_cast(main_table_storage.get());

        // 如果不是ReplicatedMergeTree引擎表,使用本地server,如果是就要考虑各个副本的
        // 延迟情况,如果延迟不满足会在去寻找其他副本
        if (!replicated_storage)
        {
            emplace_local_stream();
            return;
        }

        UInt64 max_allowed_delay = settings.max_replica_delay_for_distributed_queries;

        // 如果没设置最大延迟,依旧选择本地副本查询
        if (!max_allowed_delay)
        {
            emplace_local_stream();
            return;
        }

        UInt32 local_delay = replicated_storage->getAbsoluteDelay();

        // 如果设置了最大延迟且本地延迟小于最大延迟,本地副本依然有效,选择本地副本
        if (local_delay < max_allowed_delay)
        {
            emplace_local_stream();
            return;
        }

        // 如果以上逻辑都没有进入,说明已经不满足延迟条件了,会执行以下代码
        ProfileEvents::increment(ProfileEvents::DistributedConnectionStaleReplica);
        LOG_WARNING(
            &Logger::get("ClusterProxy::SelectStreamFactory"),
            "Local replica of shard " << shard_info.shard_num << " is stale (delay: " << local_delay << "s.)");
        
        // 如果没有这是fallback,就不能使用本地副本,去尝试获取远程副本
        if (!settings.fallback_to_stale_replicas_for_distributed_queries)
        {
            if (shard_info.hasRemoteConnections())
            {
                emplace_remote_stream();
                return;
            }
            else
                throw Exception(
                    "Local replica of shard " + toString(shard_info.shard_num)
                    + " is stale (delay: " + toString(local_delay) + "s.), but no other replica configured",
                    ErrorCodes::ALL_REPLICAS_ARE_STALE);
        }

        // 如果没有远程副本可选,而且设置了fallback,则才会选择本地副本
        if (!shard_info.hasRemoteConnections())
        {
            emplace_local_stream();
            return;
        }

        // 构造lazily_create_stream方法,避免在主线程中进行连接
        auto lazily_create_stream = [
                pool = shard_info.pool, shard_num = shard_info.shard_num, query, header = header, query_ast, context, throttler,
                main_table = main_table, table_func_ptr = table_func_ptr, external_tables = external_tables, stage = processed_stage,
                local_delay]()
            -> BlockInputStreamPtr
        {
            auto current_settings = context.getSettingsRef();
            auto timeouts = ConnectionTimeouts::getTCPTimeoutsWithFailover(
                current_settings).getSaturated(
                    current_settings.max_execution_time);
            std::vector try_results;
            try
            {
                // 这里会去远端获取entry,getManyForTableFunction和getManyChecked方法
                // 最后都会调用getManyImpl方法,只不过传入的TryGetEntryFunc不同
                if (table_func_ptr)
                    try_results = pool->getManyForTableFunction(timeouts, ¤t_settings, PoolMode::GET_MANY);
                else
                    try_results = pool->getManyChecked(timeouts, ¤t_settings, PoolMode::GET_MANY, main_table);
            }
            catch (const Exception & ex)
            {
                if (ex.code() == ErrorCodes::ALL_CONNECTION_TRIES_FAILED)
                    LOG_WARNING(
                        &Logger::get("ClusterProxy::SelectStreamFactory"),
                        "Connections to remote replicas of local shard " << shard_num << " failed, will use stale local replica");
                else
                    throw;
            }

            double max_remote_delay = 0.0;
            for (const auto & try_result : try_results)
            {
                if (!try_result.is_up_to_date)
                    max_remote_delay = std::max(try_result.staleness, max_remote_delay);
            }

            // 下面是将得到的result进行聚合
            if (try_results.empty() || local_delay < max_remote_delay)
                return createLocalStream(query_ast, context, stage);
            else
            {
                std::vector connections;
                connections.reserve(try_results.size());
                for (auto & try_result : try_results)
                    connections.emplace_back(std::move(try_result.entry));

                return std::make_shared(
                    std::move(connections), query, header, context, nullptr, throttler, external_tables, stage);
            }
        };

        res.emplace_back(std::make_shared("LazyShardWithLocalReplica", header, lazily_create_stream));
    }
    else
        emplace_remote_stream();
}

createForShard主要是决定选择本地还是远程副本的问题,下面继续看下getManyImpl方法

std::vector ConnectionPoolWithFailover::getManyImpl(
        const Settings * settings,
        PoolMode pool_mode,
        const TryGetEntryFunc & try_get_entry)
{
    // 决定获取entries的数量
    size_t min_entries = (settings && settings->skip_unavailable_shards) ? 0 : 1;
    size_t max_tries = (settings ?
        size_t{settings->connections_with_failover_max_tries} :
        size_t{DBMS_CONNECTION_POOL_WITH_FAILOVER_DEFAULT_MAX_TRIES});
    size_t max_entries;
    if (pool_mode == PoolMode::GET_ALL)
    {
        min_entries = nested_pools.size();
        max_entries = nested_pools.size();
    }
    else if (pool_mode == PoolMode::GET_ONE)
        max_entries = 1;
    else if (pool_mode == PoolMode::GET_MANY)
        max_entries = settings ? size_t(settings->max_parallel_replicas) : 1;
    else
        throw DB::Exception("Unknown pool allocation mode", DB::ErrorCodes::LOGICAL_ERROR);

    // 获取策略,NEAREST_HOSTNAME、IN_ORDER、RANDOM、FIRST_OR_RANDOM
    GetPriorityFunc get_priority;
    switch (settings ? LoadBalancing(settings->load_balancing) : default_load_balancing)
    {
    case LoadBalancing::NEAREST_HOSTNAME:
        get_priority = [&](size_t i) { return hostname_differences[i]; };
        break;
    case LoadBalancing::IN_ORDER:
        get_priority = [](size_t i) { return i; };
        break;
    case LoadBalancing::RANDOM:
        break;
    case LoadBalancing::FIRST_OR_RANDOM:
        get_priority = [](size_t i) -> size_t { return i >= 1; };
        break;
    }

    bool fallback_to_stale_replicas = settings ? bool(settings->fallback_to_stale_replicas_for_distributed_queries) : true;

    return Base::getMany(min_entries, max_entries, max_tries, try_get_entry, get_priority, fallback_to_stale_replicas);
}

getManyImpl方法主要是决定用多少entries以及远程副本的策略,继续看getMany方法

PoolWithFailoverBase::getMany(
        size_t min_entries, size_t max_entries, size_t max_tries,
        const TryGetEntryFunc & try_get_entry,
        const GetPriorityFunc & get_priority,
        bool fallback_to_stale_replicas)
{
    ......
        
    std::string fail_messages;
    bool finished = false;
    while (!finished)
    {
        for (size_t i = 0; i < shuffled_pools.size(); ++i)
        {
            if (up_to_date_count >= max_entries 
                || entries_count + failed_pools_count >= nested_pools.size()) 
            {
                finished = true;
                break;
            }

            ShuffledPool & shuffled_pool = shuffled_pools[i];
            TryResult & result = try_results[i];
            if (shuffled_pool.error_count >= max_tries || !result.entry.isNull())
                continue;

            std::string fail_message;
            // 这里就是调用了上面提到的TryGetEntryFunc方法来真正的获取entry
            result = try_get_entry(*shuffled_pool.pool, fail_message);

            if (!fail_message.empty())
                fail_messages += fail_message + '\n';

            if (!result.entry.isNull())
            {
                ++entries_count;
                if (result.is_usable)
                {
                    ++usable_count;
                    if (result.is_up_to_date)
                        ++up_to_date_count;
                }
            }
            else
            {
                LOG_WARNING(log, "Connection failed at try №"
                            << (shuffled_pool.error_count + 1) << ", reason: " << fail_message);
                ProfileEvents::increment(ProfileEvents::DistributedConnectionFailTry);

                shuffled_pool.error_count = std::min(max_error_cap, shuffled_pool.error_count + 1);

                if (shuffled_pool.error_count >= max_tries)
                {
                    ++failed_pools_count;
                    ProfileEvents::increment(ProfileEvents::DistributedConnectionFailAtAll);
                }
            }
        }
    }

    if (usable_count < min_entries)
        throw DB::NetException(
                "All connection tries failed. Log: \n\n" + fail_messages + "\n",
                DB::ErrorCodes::ALL_CONNECTION_TRIES_FAILED);

    try_results.erase(
            std::remove_if(
                    try_results.begin(), try_results.end(),
                    [](const TryResult & r) { return r.entry.isNull() || !r.is_usable; }),
            try_results.end());

    // 以下代码主要是对结果进行排序
    std::stable_sort(
            try_results.begin(), try_results.end(),
            [](const TryResult & left, const TryResult & right)
            {
                return std::forward_as_tuple(!left.is_up_to_date, left.staleness)
                    < std::forward_as_tuple(!right.is_up_to_date, right.staleness);
            });

    ......

    return try_results;
}

getMany方法就是真正获取entry并进行排序的过程,至此,Distributed表的查询的大体流程就完整了。